Wednesday, August 31, 2011

Bag Lady Week: Scalloped Dresden Bag by Amy from During Quiet Time


Today's Bag Lady is Amy, from During Quiet Time. Many of you will be familiar with her amazing handprinted fabrics that are all the rage in blog land! I first found Amy when I bought one of her lovely kokeshi doll pincushions. Then, when she made a pincushion of the quilting process, I convinced her to make a quilting process mini quilt for me. I absolutely love it, and it looks like the masses do as well because the mini quilt kits have been a popular seller in her shop. I also have been lucky enough to do a swap with Amy, and I can tell you from all of these exchanges, her attention to detail is second to none. Just take a look at what Amy has come up with now! Droooooool.......


Kristie, thank you for asking me to participate in "Bag Lady Week" (though I am a little unsure that I want to share such a title)! I would like to offer your readers a free pattern/tutorial that I devised using a scalloped edged Dresden for the bag's flap! This will be my new bag for the fall so I chose a dark brown slub linen for the exterior with some of my favorite scraps in dark brown, pale pink, celery and Cinnamon for the Dresden blades. I lined the bag with Kona Celery.
Just download the pdf and you can get started!
Scalloped Dresden Bag Free Pattern

In honor of "Bag Lady Week" I'd like to offer up a giveaway of a copy of my pdf pattern for the Ruched Happy Bag

as well as the Hexiecase!

Just leave a comment below and Kristie will draw two names! If you'd like to visit me, I blog at During Quiet Time and sell my handprinted fabrics and patterns at my Etsy shop.

Thanks so much for joining in on the fun, Amy!

THIS GIVEAWAY IS NOW CLOSED

Tuesday, August 30, 2011

Bag Lady Week: Drawstring PE bag by Alison of Little Island Quilting AND a Noodlehead giveaway!


Alison at Little Island Quilting has been one of my first and favorite blog friends! I refer to her as "Number 6" as she was one of my initial followers, after my parents, sister, a friend..... She is always so supportive and encouraging, but also has a cheeky streak which I love ;) Oh, and did I mention she makes the most fabulous quilts? Alison knows how to embrace color like no other, and can turn what seems like a mangled riot of pattern and color into a perfectly harmonized masterpiece. And lucky me- I have the pleasure of enjoying one of her beautiful quilts in my very home, when she generously hosted a quilt giveaway to support Japanese earthquake victims. Be sure to go and say hello, and while you are at it, check out her awesome take on the spiderweb pattern. So, without further ado, here is Alison and her laminate-lined PE bag!

Possibly not the most glamourous of bags, may I introduce you to the 'oh no it's not back to school already is it?' PE bag.


Please note: I made the bag the size I felt worked best for its intended use. Feel free to make it bigger or smaller.
This bag also works just fine using regular quilting weight fabric for both inner and outer pieces.

Requirements
1 x piece of outside fabric - I used home decor weight and I cut the size 30 inches long by 20 inches wide
1 x piece of inside fabric - I used laminated cotton (for its wipe clean finish) which is now on sale where I got it from. It goes without saying that you CAN NOT iron/press directly on to laminate so if you are using laminate, press it with another piece of fabric on top of the laminate...bit like when you are blocking a piece of knitting and you put a damp tea towel over your knitting and then press down.
Small piece of webbing (6-8")
Pocket (optional) one inner and outer fabric piece - I made mine 6" wide and 10" long
Piece of elastic slightly longer than the length of the intended width of your pocket

The process

Start with a clean work area:


What do you mean"it's not clean?"


2. Cut bag and pocket pieces to appropriate size.

3. Make the pocket. You can skip this part if you like but the reason I have added an outside pocket is this bag will be used for swimming lessons. An outside pocket is handy to store goggles, reading glasses, swim cap, earrings, watch etc. I therefore based the size of my pocket on the need for goggles to fit in it - hence why it is wider than it is taller.

Sew the two pocket pieces together along one long edge, right sides together.
Press seam open.
Flip over so you have the right side of your outside fabric facing you and stitch 1/2 an inch from the seamed edge to form a channel through which you will pass some elastic. The narrower the elastic the narrower the channel you are going to make, the wider the elastic, the wider the channel. Depending on what size elastic you have to hand you may want to adjust the 1/2 inch up or down a bit.


Next, thread your elastic through so that it is poking out a bit either end and mark one inch in from either end


Gently pull from one end so that at the other end the elastic starts to go back inside the tube; stop when you get about a 1/4 of an inch before your penciled one inch mark and sew the elastic in place
on the pencil line


Repeat with other side until you feel you have the level of elastic tightness that you are after - took tight and you won't be able to get anything in; too loose and things will fall out. Now is the time, if the urge strikes you, to embroider your child's name on the bag or the pocket. I'm going for the subtle look and sewing her name tag onto the webbing loop...more of that later.

Fold under a 1/4 inch around two sides and bottom of pocket and pin to front of bag. I chose to put it towards the bottom of the bag. When sewing the pocket, sew on the right hand side of your single fabric piece as in the next step, the bag fabric is folded in half lengthways...meaning the fabric to the left of where you have placed the pocket will become the back of the bag.


Fold inside and outside fabric in half lengthways, right sides facing and mark one inch down from the top edge of the bag, as well as two inches down.


Sew down the long side of both the inside and the outside of the bag BUT NOT in the gap between the one and two inch markings.This is going to form the casing for the drawstring for the bag. On the INSIDE BAG ONLY, leave a gap of about four to five inches somewhere along the middle of the bottom edge. If you forget this bit it'll all go pear-shaped later on.


Press all seams open. Where there is now the one inch casing gap, sew about 1/2 inch all round as in the next image. Do on both inner and outer bag.


Attach a 6" piece of webbing to the opposite side of the bag to where you have the one inch casing opening. Tip: I used a piece from the webbing that holds jelly rolls together. This will be used to hang on your child's coat peg at school if you are lucky. If you are not so lucky it'll get dumped on the cloakroom floor somewhere and you will have to go in to school at some point during the first term to personally look for it as your child will declare it has 'definitely gone missing' and 'I dunno where it is.'


Now.. this bit is crucial. The inside bag should be INSIDE OUT and the outside bag should be THE RIGHT WAY. Put the OUTSIDE bag INTO the INSIDE BAG (which is inside out).
You'll know you've got it right as when you are matching the tops of each bag together, they should both be RIGHT SIDES facing. Also make sure you have matched up the one inch hole for the casing. Pin in place and sew.


Now the fun bit. Remember the four to five inch gap you left in the inside bag? Pull the outside bag through this hole.


Stitch the four to five inch gap closed. The gap will naturally fold itself in (because of the seam allowance before and after the gap) - try to sew as close to the edge as possible. If you are using laminate cotton this will be the only time that you actually sew on the top (therefore possibly slightly sticky) of the laminate and you may need to help the fabric through as you stitch, by pulling gently from behind the needle and the sewn line in front of the needle

Make sure that both inside and outside are nicely matched up (including the casing hole) and press the top edge. Using your stitching you made for the casing as a guide, first sew the top line of casing all the way around the bag and then sew the second line.


At this point you could now get some cord, attach it to a safety pin and thread the safety pin all the way around the channel. I happened to have a spare piece of outside bag fabric left so I made it up into a co-ordinating cord and threaded this through.


And there you have it. A new school PE bag for the new school year!


Everything always looks so pristine at the beginning of a new school year. It's not going to stay like that though is it?

Thanks for the tutorial, Alison!


THIS GIVEAWAY IS NOW CLOSED

Noodlehead


And now, for today's giveaway, we have Anna from Noodlehead. Have you had the chance to admire her latest pattern yet?


It is called the Go Anywhere bag, and it is the perfect size and shape for the busy woman on the go. The best part is all the pockets- perfect for making sure the things you need are organized and at hand when you need them.


Anna is a Bag Lady to admire, with her 241 tote, the Runaround bag, and her classic, the gathered clutch pattern. Be sure to check out her patterns page!


Anna has kindly offered up some patterns for my readers today! To enter, leave a comment telling me which is your favorite Noodlehead bag pattern. I will draw 3 lucky winners next Monday, September 5. Good luck!

THIS GIVEAWAY IS NOW CLOSED

Monday, August 29, 2011

Bag Lady Week: Roll-up market bags and a giveaway by Needle and Spatula


Welcome to Bag Lady Week!
(enter Oprah-like whoops and hollers)

I thought I would kick things off with a tutorial for some fabric market bags that can be rolled up and tossed into your purse, ready when you are! These babies are lined, so strong enough to tote the heaviest of purchases, and the twill tape handles are a fun feature. I hope you enjoy!


Here for the giveaway by Needle and Spatula? Scroll down for details!


I came across this super cute fabric (on clearance!) at my local Fabricland:

Perfect for making reusable grocery bags! I have a few that I have picked up along the way that are compact and fit nicely in my purse, and I love having them on hand. I have been itching to make some with twill tape handles ever since seeing those made by Elizabeth. Making handles is classically my least fabric part of bag making, so the twill is the answer! I decided to make a few for myself and for swaps for some of my bloggy friends. And while I was at it...a tutorial for you!

Here a few examples of the bags. The first I made for Kaelin, using some linen and patchwork. As you can see, it is a nice, generous size :)

The second one made its way to Sandy in Australia, using the scraps Elizabeth sent me:

I made one in Dream On and Meadowsweet for me, and one for Sarah:


And finally, one all for me. Perfect for trips to the wine store, for some "Mommy Medication," is it not?? Used some of Victoria and Albert's wine bottle print I won from Megan, lined with one of my very favorite older prints by Alexander Henry:


Two different ways to roll 'em up, folks! Ribbon ties (easy peasy):


OR more twill and snaps (a bit more work). Your choice!


Let's get started!

What you need:
-1/2 yard of fabric for exterior
- 1/2 yard of fabric for lining
- 3 yards of wide twill tape (mine was 1.5 inches wide) for snap closure. If using ribbon closure, you will need 2 yards only
- snap (I used a heavy duty magnetic purse snap, but you could use a standard one) OR 1 yard of ribbon

Sew it up!
* all seams are 1/4 inch unless stated otherwise*

1. Cutting (be cognizant of directional fabrics):
a. Cut 2 lining pieces measuring 18" tall by 16" wide.
b. Cut, or piece together as desired, 2 exterior pieces also measuring 18" tall by 16" wide.

2. Place lining pieces right sides together and sew along 3 edges, leaving top edge open. *Leave a 3 inch opening in the bottom of the bag* Reinforce with a zig zag stitch if desired for added strength.

3. Place exterior pieces right side together and sew along 3 edges, leaving top edge open. Reinforce with a zig zag stitch as in step 2.
4. Square off bottom corners of bag. To do this, take exterior bag, inside out, and line up the bottom seam with the side seam as shown:

Take a ruler and draw a line 2 inches from the tip of the corner.


Sew along drawn line and trim. Repeat for lining!

5. Decide if you are adding ribbon ties or a snap tie.

For ribbon tie- cut into 2 pieces, 0.5 yards each.

For twill tape and snaps:
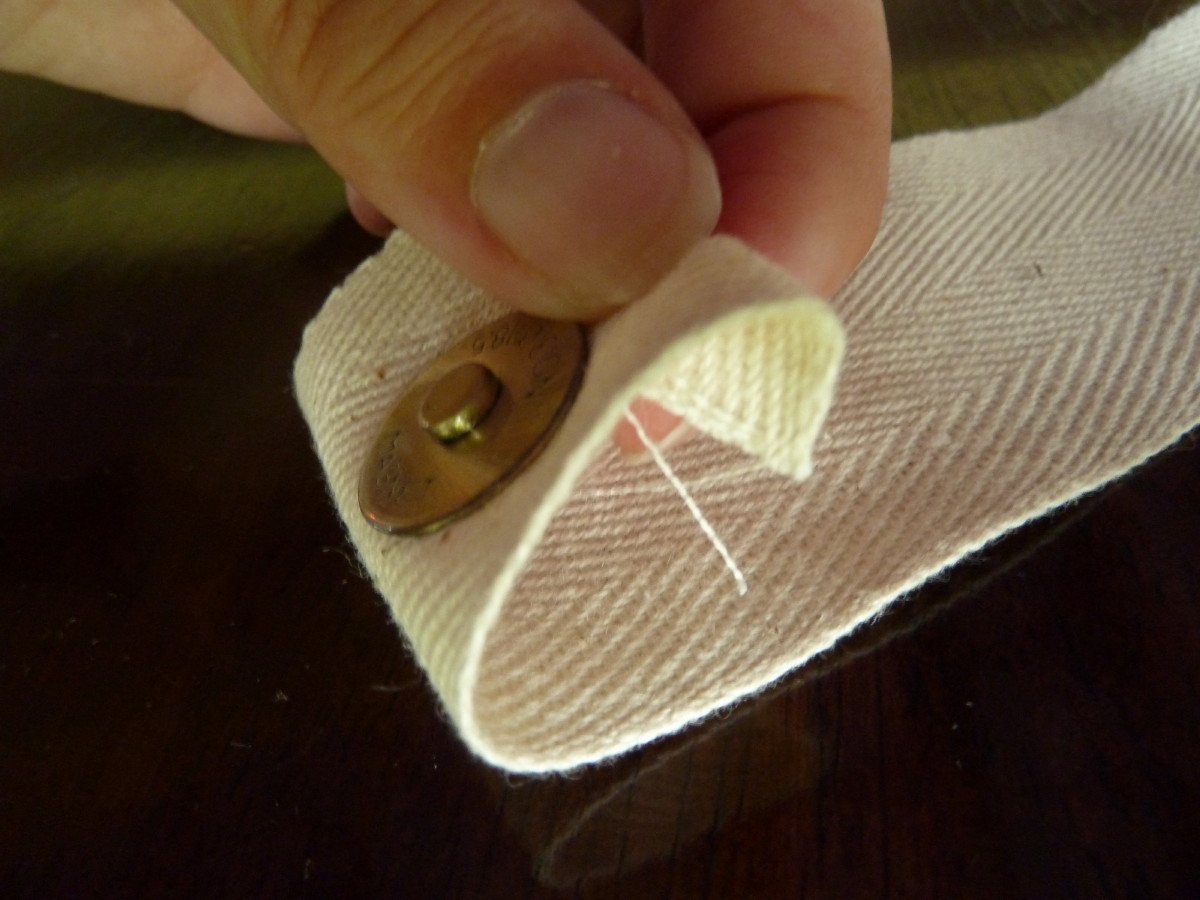
-take 1 yard of twill tape. Attach "male" part of snap, approximately 1 inch from end.
-fold under 0.5 inch of raw edge, and fold again as shown:

-stitch to secure

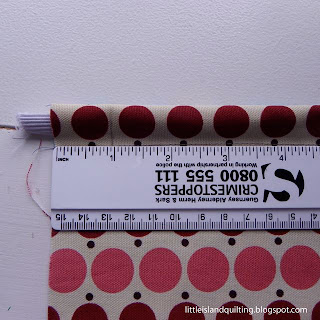
-place this end face down. Attach "female" counterpart of snap on the other end of the twill tape in the same manner, also facing down. Then fold over the female end so that it is facing up, 9.5 inches from male end as shown:

-sew to secure:


6. Once your ties are made, place exterior bag, right side out, inside of lining bag, which remains inside out (i.e. right sides should be facing each other). Insert tie between layers (sandwiched between the right sides) centered on the back of the bag, and pin in place.
Note- if using snap tie, insert so male end dangles down, and female end is near upper part of the bag. The female part should be face down against the exterior of the bag:


The total length dangling down should measure 12" (see here, finished):


7. Sew along top edge. No zig zag needed here.

8. Turn the bag right side out through the hole you left in the lining in step 2.

9. Fold raw edges from lining hole into bag and sew hole closed with a 1/8" seam.

10. Press the top edge. Your bag will now look like this:


Attaching handles:
1. Grab your 2 yards of twill tape for the handles and measure center- press to mark. Fold end of twill tape over 0.5 inch and pin horizontally, aligned near top to the bag, so it overlaps one side seam slightly. Extend twill tape 4.5 inches towards center of the front of the bag. Fold twill tap upwards on diagonal to make handle.

2. Find your pressed center of the tape and pin it to the opposite side seam. Line tape towards center 4.5 inches in mirror image to the other side- the remaining twill tape will form your handle. Ensure it is not twisted and pin in place.
3. Flip bag over and repeat for other side, with the end of the twill tape overlapping the start on one side seam. If centered properly, the handles should measure the same length (give it a check to be sure!). Pin it all in place.
4. Sew around top of tape around entire top of bag, then continue sewing along the diagonal and bottom edges of the twill tape to secure. Just be sure to move your ribbon or snap ties out of the way, eh? Ask me how I know :)
Finishing Up:
- if using ties- roll up and tie it up. Trim length as needed and knot ends to finish.
- if using twill and snaps, verify that it fits snugly when rolled up. Should fit well! If too short- grab your seam ripper....if too long, you can fold over some of the twill tape and sew to shorten.


That's it, people- you're done! Time to go shopping!

I hope you enjoyed this tutorial! For personal use only, please. If you have any questions, feel free to e-mail me at obsessivecraftingdisorder {at} yahoo {dot} ca

I would love to see what you made! E-mail me a picture or add it to my Flickr group for creations inspired by my tutorials.


NOTE: THIS GIVEAWAY IS NOW CLOSED
Phew! You deserve a treat after all that. How about a giveaway??

Have you met Kate from Needle and Spatula? Her site is filled with sewing/knitting/quilting and cooking inspiration and free tutorials! She also hosts a monthly Blogger's Dinner Party where you can show off your kitchen creations and win great prizes! She and I will be getting cozy over the next couple months as we do a joint quilt along, details to be announced next month! But right now, Kate is in Hawaii recouping from a cross country move...sweeeet! Kate has offered up a couple FREE PATTERNS from her shop! Would you like to make one of these little lovelies?

I thought so! Leave me a comment telling me your favorite vacation destination. I will draw 2 winners on Monday, September 5- winners will get their choice of pattern! The patterns are also available for instant download in her Meylah shop or on Etsy and are currently on sale for only 5 bucks!
THIS GIVEAWAY IS NOW CLOSED