
 This tutorial is inspired by this really cool mesh material I recently found at a little quilt store called Keeper's Quilts in the tiny beach town of Winnipeg Beach. It is unlike anything I had seen before (though I don't get out much...it may be everywhere). It is a soft plastic texture and came in a variety of bright colors. It was labelled "pet screen" but the owner, Shelly, had made a small purse from it, and immediately I thought that if I enlarged it, it would become the perfect beach tote. So I don't take credit for the design! While this fabric is awesome, I think this bag would look equally cute substituting a canvas material, so whatever you have on hand, give it a try! Or, give Shelly a call and she will mail you out some:-)
 Let's go!
You will need:
-a piece of mesh or canvas measuring 20" wide by 27" long (you can vary this for the size of bag you need)
 -a fat quarter of cotton quilting weight fabric for the trim
-a small amount of coordinating fabric for the handles (28" by 6 "), plus some narrow stips of quilt batting (I used my scraps) or interfacing (26" by 2")- or use an alternative handle material!
-coordinating thread
Cutting
- from your fat quarter, cut a piece 20" by 9", and 2 pieces 20" by 4.5"
 - for the handles, cut 2 pieces 28" by 3" from the fabric, and 2 pieces 26" by 1" of batting
 Instructions:
Take all fabric pieces and press ends over 1/4" along long sides only. 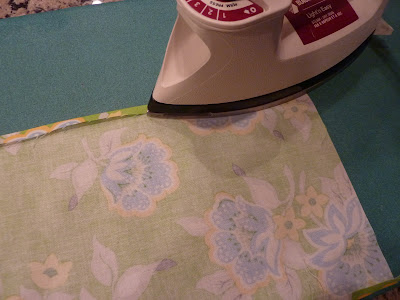
Take large piece and gently press in half, wrong sides facing, to mark center. Similarily, press the 2 handle pieces in half. Take other 2 trim pieces and press 1" over with wrong sides facing (see below). 
Fold mesh in half. Center large piece of fabric over fold with wrong side to mesh, so that it extends equally on either side.

Pin, tucking under the 1/4 seam you just pressed.
 Sew along length, close to edge.
 Take trim piece and line up fold on one top edge of mesh, wrong side on mesh. Pin short side to mesh on back side (i.e. side that does not have fabric sewn to it yet), pulling remainder out of the way, and sew it to the mesh.
  Once done, fold over other (longer) half, pin and sew. Repeat with other trim piece on remaining raw edge of mesh.
 Take handle fabric and insert batting, tucking under folded seam.


 Fill 'er up with towels, a good book and a cold drink. Enjoy your new mesh beach bag, and most importantly, enjoy the beach!
Sew along length, close to edge.Take trim piece and line up fold on one top edge of mesh, wrong side on mesh. Pin short side to mesh on back side (i.e. side that does not have fabric sewn to it yet), pulling remainder out of the way, and sew it to the mesh. Once done, fold over other (longer) half, pin and sew. Repeat with other trim piece on remaining raw edge of mesh. Take handle fabric and insert batting, tucking under folded seam.Line up edges, and sew closed. Sew along opposite (fold) side for esthetics.
To attach handle, measure 6" in from side edge of mesh , then fold raw end of handle on itself.
Sew in place using a cross box as shown. (Note- originally I did this on the wrong side of the bag to hide it, but liked how it looked so much I attached them on the outside of my next bag.) Repeat to attach other 3 handle ends. 
Flip bag so right sides are facing. Ensure that trim and bottom fabric seams line up (trust me, it is not fun to stitch rip this stuff!), trim excess fabric from sides to make straight, and sew from top to bottom along each side.Reinforce with a zig zag stitch.
To finish, finger press this seam to one side, and sew down with a straight stitch (sorry, not shown!). This step is awkward, but you don't need to go entirely to the bottom of the bag, just enough to flatten the seam as the material is stiff. Turn the bag right side out, and you are done!
Fill 'er up with towels, a good book and a cold drink. Enjoy your new mesh beach bag, and most importantly, enjoy the beach!As with all my tutorials, they are intended for personal use only and not for production for sale.
Feel free to blog about your creations, and a link or credit back to this tutorial would be appreciated. I would love to see your bag, so do send me a link or email with a picture, or add one to my Flickr group! Happy sewing!

Feel free to blog about your creations, and a link or credit back to this tutorial would be appreciated. I would love to see your bag, so do send me a link or email with a picture, or add one to my Flickr group! Happy sewing!