I think Cathedral windows have to rank right up there with my favorite quilt blocks. They are simply gorgeous. But, when I read tutorials explaining the crazy fabric origami skills required to make a single window....yah, I am just too lazy for that racket, I admit it flat out. So, I decided to find a slacker way to cheat.
The great thing about this method is that as the blocks are joined, the backings have a finished appearance as the technique is similar to
rag quilting. Also, the finishing of each block to produce the windows sews through the layers, so it doubles as quilting. If you are making a quilt, you can add batting between the layers, however even without, this would make a nice, light weight throw.
Note: While traditional cathedral windows finish up with the window in a diamond orientation, the cheater method finishes square- you can get the traditional arrangement easily by setting the blocks on point.
Here's what you do!
Each finished cheater cathedral window block will measure 3 inches by 3 inches.
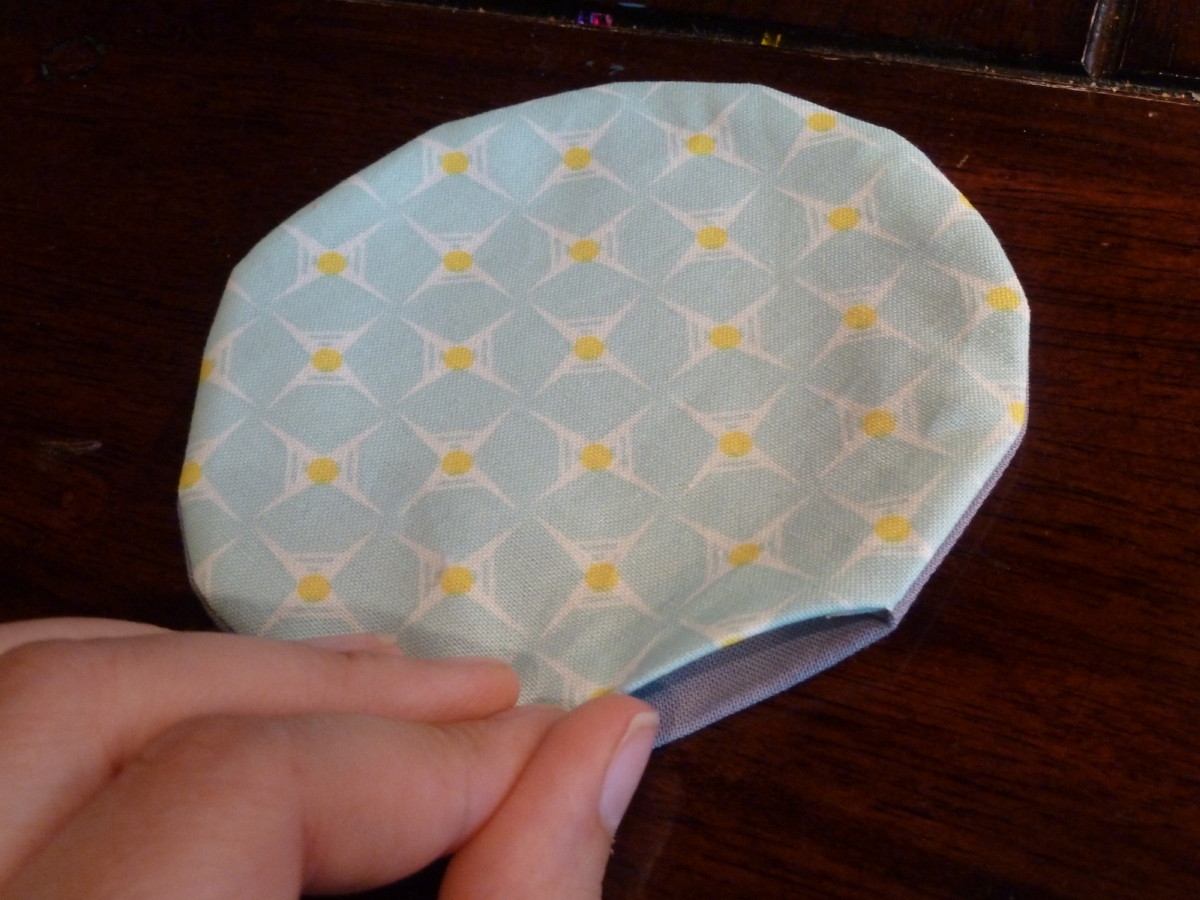
To make each window, you will need to cut two 5" circles, one for the backing that will overlap at the sides, and the "feature fabric" that will be seen "in" the window. I used My
Go! Baby with the circle cutting die and had the 100+ circles required for my pillow tops cut up in no time! For the grey backing I cut 5.5" strips of WOF and cross cut into 5.5" squares, stacked them into the Go! Baby and away I went. For my feature fabrics, I used scraps of my Nicey Jane from
this quilt and sent them through. The Go! Baby can cut 6 layers of quilting at a time, so it was very quick and efficient. I was very happy with the performance. Wish I had been able to use this for the bazillion individually cut circles for my
mixed sushi quilt!!

There are two ways to sew each block. Use whichever you are comfortable with- I did a combination of both to try them out and found them equally successful (though I personally preferred Method A).
Method A:
1. Placing wrong sides together, sew entire edge, using 1/4 inch seam.

2. Cut a slit on the feature fabric side, about 1 inch in length, and 1/2 inch from the sewn seam.
Be very careful to only cut through the one layer of fabric!! Also, if you are using a directional fabric, think of how it will be oriented and make sure the slit is on the side or top, not the corner area.

3. Use the slit hole to turn the fabrics so they are right side out, pushing seams out from inside to make nice round edges.

4. Press.

5. Set aside for assembly (see below).
Method B:
1. Placing wrong sides together, sew with 1/4 inch seam but leave a 1 inch space.

2. Use hole to turn fabrics so they are right sides out, pushing seams out from inside to make nice round edges.

3. Press, folding over open area to make the outer perimeter a smooth circle shape.

4. Set aside for assembly (see below).
Assembly
You are now ready to join the circles together to make your windows.
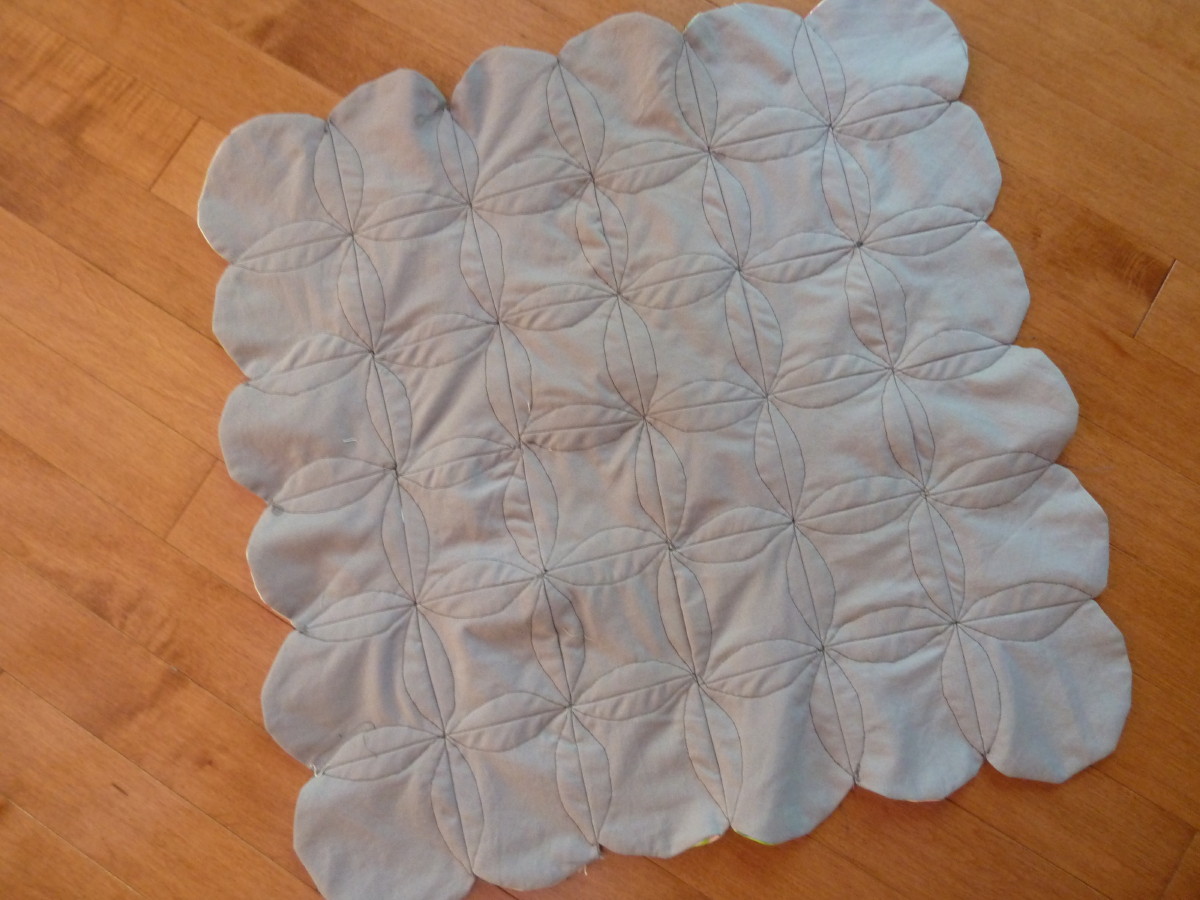
1. Make a 3 inch square template from plastic or card stock. Center it on your circle block and use a fabric marker or pencil to trace (these lines will be covered once sewn).


2. Take 2 circles and align, back parts facing, so line on front of each are lined up.

3. Sew along this line as shown.


4. Continue to add blocks to end of row. Your rows should look like this:

5. Line up rows and sew together. You will have a block with edges all turned upwards like so:
 Finishing:
1. Press the upturned edges as shown, to overlap on their own block.

If using Method A, note how the slits will now be concealed:

2. Top stitch by hand or machine, close to edge.

You are finished!

Check out the finished backing as mentioned above:

Now use your block of windows to make something beautiful- a quilt, placemats, or as I did, pillows! I will be doing a second tutorial on the construction of the pillows themselves this week :)

Feel free to email me with any questions or clarifications at:
obsessivecraftingdisorder {at} yahoo {dot} ca
And if you make some of your own cathedrals using my tutorial, be sure to add some photos to my
Flickr group! Please. It is pretty lonely over there.....{sigh}
Hope you enjoyed "cheating" along with me :)