
Like "The Classic," this dress was made from a pillowcase, and for less than $2! The big side bow at the neck is perfect for a party princess.
You will need:- a pillowcase
- coordinating fabric for the bow and hem band (1/3 yard)
- coordinating thread
- safety pin
Steps:1. Measure your little girl from her armpit to about the knee (I usually go a bit longer because I try to make it to last 2 summers!).
2. Fold your pillowcase lengthwise, and cut a j-shaped section from the top (closed) end, with the bottom of the j starting at the distance you just measured from the bottom (open) end of the pillowcase. This will be the armhole. The j should extend about 3-4" into the fabric horizontally, then continue up to the top vertically (see first photo below).
3. Cut a diagonal line along the non-folded side, starting about 2" into j shape of armpit and extending towards hem (open end of pillowcase). This helps give the dress some taper along the sides, otherwise I found it to be too boxy.

4. Cut 6 inch band of coordinating fabric to width of fabric. Fold over long raw edges 1/4 inch. Press. Fold in half. Press. Align along bottom hem of dress, and stitch into place near top of band. Trim excess. (Sorry! I must have forgotten to take a picture of this step!)
5.Sew side seems of dress with a straight stitch. Reinforce with a zig zag for good measure.
6. Fold the armhole area over 1/4 inch. Press. Fold 1/4 inch again, press again.

7. Sew along folded edge to finish armhole. Repeat for other side.

8. Fold the top edge (neck) of the dress over 1/4 inch. Press. Fold over again 2 inches and press. Sew, staying close to edge, leaving ends open. This will be the channel for your bow fabric. Repeat for other side.

9. Cut a 4.5 inch strip of your coordinating fabric, length the width of fabric.
10. Fold fabric in half, right sides facing. Press. Sew length to close strip using 1/4 seam allowance.

11. Use safety pin to invert strip tube you have just made, using fingers to work the safety pin out the other side. Press.

12. Tuck ends of strip in. Press.
13. Sew ends closed, and sew along all edges so that all of strip has a nice stitched edge as shown.

14. Attach safety pin to strip and use fingers to work it through the front channel until it emerges on other end. Continue through the back channel so that the 2 strip ends end up on the same side of the neck.


15. Measure 15 inches from end of each strip, then sew strip to dress as shown to secure.

17. Evenly distribute ruffles of neck. At other end of neck, sew dress to strip, arranging so that top part is shorter than the bottom, as shown. This will help the dress to sit flat on the neck.

Put it on your little princess and tie a big bow! You are finished!

Congratulations! I hope you have enjoyed the Pillowcase Dress Tutorial series. I would love to see a picture of your finished creations in my
Flickr group. Have fun!


 Aren't they sweet? A nice variation from the normal purse. They hold surprisingly a lot of stuff, and can be casual or dressy, depending on the fabric. They are fully reversible, and look so cute dangling off your wrist.
 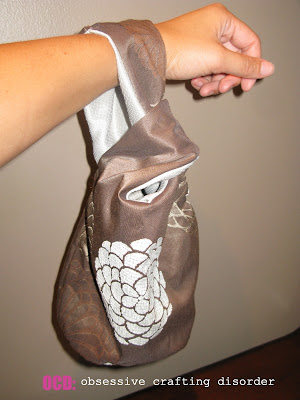 This lovely pattern is by Helen Heath of New Zealand, and the free pattern is available here. Go check it out!


 straps- cut 2 piece of 26" each
 2. Fold over top of each piece 1/2 ". Press. Fold over 1". Press.
 3. Insert edge of strap under fold, 5" from each end. Fold over so handle is facing up as shown. Pin in place to secure.
  4. Sew 1/4" from bottom fold and from top fold to finish top and to secure handles. Repeat with second piece and handle.
 5. Fold over short ends of long piece of fabric (sides and bottom of bag) as you did above- fold over 1/2 inch, press, fold over 1 inch, press. Sew at 1/4 inch from top fold and from bottom fold.


 I love messenger bags. They are casual but functional, stylish but can be very practical, slung over the body to keep hands free for a mom like me. I have been checking out a bunch online, and have seen some I covet, but they were all over $100. So, I drew up a pattern and tried my hand at making one.
  This one is not for me, but for my lovely little sis, who is a fan of black, grey and blue. It was her birthday and she is about to go on an adventure to Holland, England, Sweden, Finland and Iceland, and I thought this could be a useful tag-along. I picked up this charcoal suiting with a blue pinstripe at my local fabric store, then paired it with some Amy Butler for the lining to add some fun:
  The strap is fully adjustable so it can be worn as a purse or over the body.
 The back features 2 deep pockets, so you can stash phones or keys for quick access, without having to undo the buttons to get inside the bag.
 I finished it off with some cute buttons as closures, with loops made of the lining fabric.
 The second bag is for a good friend of mine, who loves orange. She is an incredibly smart and brave girl, who, at the age of thirty(-something), followed her dream and went back to school, and after lots of hard work and perseverance, was accepted into veterinary school. I am so proud of her!
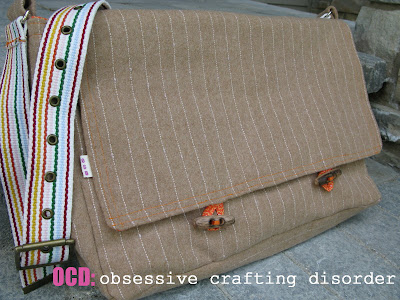


 For the bargain price of $2.99, I, too, can sew straight lines.
  Ooooh. Aaahhh. This crazy contraption cuts perfect circles. Because I might want some, someday. And it was half price. Fun!
 Yes. This is the stuff that is "high tech" to me. I am so easy to please :-)


 .....which contains....
  .....knitting needles! Lots of 'em! Since I have only
  The whole stack, $6.25! I love me a good deal :-)