Several weeks back, our 18 year old babysitter was over and I noticed her awesome felted wool mittens. I tried to play it cool, though I wanted to rip them off her hands and turn them inside out and dissect them. But the rational side of my brain (the one that doesn't want her to think I am a freak so she will actually babysit again) took control and I showed restraint....though I inundated her with way too many questions to be considered casual!
Anyways, they have been rattling around in my mind since then, so when I saw the
wool sweaters at the thrift shop....jackpot!
Now, I know some of you people have been spouting off about SPRING and things BLOOMING (curse you!), but where I live, we have a month or two left of the white stuff.....and some pretty new mitts will certainly help me get over the winter doldrums. They are also a sweet gift for friends (if you want to get started on those Christmas gifts early!). So, let's make some felted mitts!
 You will need:
- a sweater made of 100% wool (note: depending on the size, you can get 2-3 pairs/sweater)
- Some bits of fleece for lining, though you can leave them unlined as well. A half yard made me about 4 mittens. I used some Polartec fleece from my LQS. I'm not fooling around- I want WARM mittens! It was -25C degrees this weekend, so I can verify that these are indeed really cozy!
- thread, scissors, paper
- embellishments, if desired
- about 2 hours of time to kill
I would suggest this project for an advanced beginner or intermediate sewer...a few tricky parts, but not rocket science.
Here's what you do:1. First you need to felt that sweater. This involved throwing it in the wash on high heat, then popping it in the drier with the same. Felting shrinks the wool up, making the weave nice and tight resulting in a nice thick, warm fabric.
2. Make a pattern: Grab a piece of paper and trace around your hand, leaving a generous margin of 1" or more. Go a bit wider than the picture here- the first pair I made were a bit tight. Don't trace around your thumb.
 (man, I look like I have old lady hands!)
3. Add a dashed line a few inches from the bottom, or the width of the cuff of your sweater. You will use the cuffs for the wrists of your mittens, but the lining stops inside so you can roll up the cuff if desired- the dashed line is for cutting your lining. Add 3 lines as shown for cutting out the thumb area. (Note- you will use this pattern in reverse for the second hand, so you can trace these lines on the back side of the paper as well to make left/right mirror image patterns).
 4. Make a rectangle pattern the width of the thumb area, but twice the length (shown below in step 7).
5. Cut your wool: Line up your sweater on the pattern with the sleeve cuff at the bottom. There will be a seam in the sweater sleeve (I am pointing to it in the photo)- it doesn't matter if you line it up on the thumb side or other, just make sure it is the same for both mittens. Cut- leave cuff intact.

 Note- you can make additional pairs of mitts from the same sweater by utilizing the waist ribbing. Just fold it over and cut along one side. Or cut 2 pieces like you will do for the lining (see below). Waste not, want not!
6. Repeat for opposite sleeve in mirror image.
7. Use pattern to cut thumb area as shown for each side. ONLY CUT THUMB PIECE THROUGH ONE LAYER OF THE SLEEVE!

Cut two rectangular pieces of wool for the thumb area as shown (using the pattern from step 4).


Note- this is a good time to embellish your mittens if you would like, before they are all sewn together. I used some buttons, and made some decorative flowers and polka dots using bits of felted wool, Perle 8 thread and yarn. Fun!

8. Cut your lining pieces (if using lining) using the pattern and stopping at the dashed line. Note that you will have to cut a front and back side of the lining, with only one side cut for the thumb (see photo).

9. Assembling lining: Flip the thumb piece up and over. Align and pin thumb area as shown, right sides facing.
 This is where you need to be paying attention- Sew it up (adding a curve to the thumb top area), making sure not to sew the thumb portion to the body of the lining. This will require some shifting and pivoting of fabric as you go. You are smart, I am sure you will figure it out ;) Stop sewing at the point where I am pointing in the picture above (aren't I high tech?). I reinforced all my seams with a zig zag stitch. It doesn't have to be pretty, this is only the lining!
 10. Sew along the outside curve of the mitten lining, right sides still facing.


11. Try it on for fit and adjust as needed. Repeat for second hand.

12. Time to sew the wool. Flip the cut sweater sleeve inside out. Attach the rectangular thumb piece to the thumb area as you did for the lining, right sides facing (see step 9). Continue on to sew outside curve of the mitten. Zig zag, etc.


13. Flip it inside out and try it on. If you made a lining, slip that on your hand and the mitten body over top to ensure fit. Adjust as necessary for thumb length, etc. Once satisfied, invert mitten body again (lining always stays with wrong side out- that is how you will wear it!).  14. Align lining and body as shown in the photo. Slam a couple hand stitches (or machine stitches) to join the upper curve of the lining/body and of the thumb area. This will secure the lining to the wool to prevent it from coming out when your take your mittens off (how annoying!).

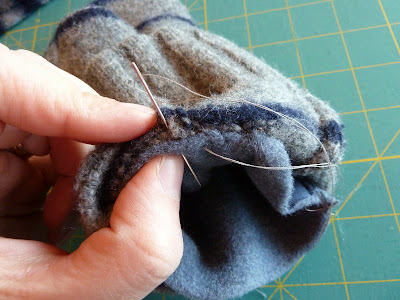
 15. Turn mitten right side out, which should leave the lining nicely in place inside. Roll back the cuff to expose the raw lining edge. Fold the raw edge over, and hand stitch in place, being sure to stretch as you go so that you don't constrict the wrist opening.
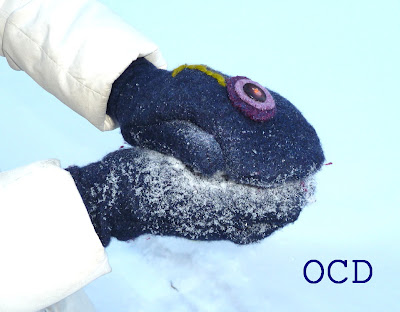
 16. Admire your awesome creativity and sense of style. Go make some snowballs. Rock those mittens!


Hope you enjoyed this tutorial! If you have any questions, feel free to email me at:
obsessivecraftingdisorder@yahoo.ca
I would love to see your creations! E-mail me a pic of the finished masterpiece, or add your photos to my Flickr site.
Have fun! Tutorial is for personal use only, please, unless you have my expressed consent. Feel free to blog about your creations, but as a courtesy please link back to this tutorial. Thanks!