Showing posts with label Denyse Schmidt. Show all posts

Monday, July 28, 2014

a pile of finished quilts for the cottage

Of course getting a new cottage last summer meant that I "needed" new quilts for every bed (and any other possible surface).  And it just so happens my girls have a pair of bunk beds in the "girls' room".  Four twin quilts were in order!

I decided to do coordinating but not matching quilts.  They will all be in one room so I wanted a bit of a colour theme but not looking too....orderly ;)  Keeping it carefree! So, I planned two quilts using Briar Rose for The Middle Child's bunks, and then two quilts in a variety of yellows, oranges, pinks and greys for the bunk beds for Last But Not Least.  I got 3 of the 4 pieced by last November's Loon Lake retreat....but then they sat...and sat...

Well,  while enjoying a lot of this over the past few weeks...


....I have managed to baste, quilt and finish these three!

Only one of the Briar Rose ones done, but here it is:


Did a bit of a lattice, and quilted it with an all over daisy and loop pattern.  Bound it in some Flea Market Fancy green seed print and made a simple but cute cottage label, just using a Sharpie.


Then it was on to LBNL's quilts.  I kind of favour these, I admit.  First, a granny square quilt with some stippled quilting:


Loved how the orange binding on this quilt matched the front and AMH back so perfectly.  Again with a label.


And finally, a fun equilateral triangle quilt!  Straight line quilting along either side of the seams for this one.


A happy yellow Kate & Birdie binding and one of my favourite backings...love those big pink flowers! And another label!  Go, Me! ;)


And here are the two coordinating ones together.  Love how they compliment each other.


Phew!  Now it's time to sit back and drink some wine and have a rest, wouldn't you say??  Back to the lake I go!

Tuesday, July 9, 2013

A quilt for Ryker

A friend approached me to commission a quilt for her friend, who I haven't met.  She is pregnant with their second child, a boy they have already named Ryker.   However, they were recently given the devastating news that the fetus has a condition making it incompatible with life.  Instead of terminating the pregnancy, the couple has decided to carry the baby to term, hoping to maybe have a few hours to hold their son before he passes.

They call Ryker their little sunshine, so I decided to base the quilt top on sun and sunbeams.  The top is one big paper pieced block.  I had never paper pieced before, but I did a few practice blocks, then sketched this out on freezer paper, roughly using this free tutorial on Craftsy as a guide.  I gotta say, I see more paper piecing in my future!


The top piecing is really quilte simple, and my plan was to do some fancy free motion quilting along the beams to make it meaningful.  I used a nylon "invisible thread" for the first time, this one by Connecting Threads, and was really pleased with the result.  It blended well with all the bold colors here, letting the texture steal the show.

In the sunshine, I tried my hand at some curve-on-curve quilting.


In the orange, I did some "ribbon candy."


In the lighter blue beams, I quilted radiating waves, and put words in them.  I stitched in "Ryker", "you are my sunshine,"  "love lasts forever," and a simple heart.  The alternate navy beams are each a different pattern: a quilted plaid, a stipple, pebbles,  radiating circles and clamshells.  The result is a quilt filled with lots of lovely texture.


I used a DS plaid for the back and Joel Dewberry herringbone in navy for the binding, which was machine stitched in place (getting better at that).


I am hoping this quilt provides some comfort to Ryker's parents; something to hold when he is gone.

Linking up to Fabric Tuesday at Quilt Story.

Tuesday, October 9, 2012

Ghastlies quilt is finished!

It's done!  Muahahahahaaaaaa!  (Did that sound evil?)


This quilt has to be the most "unnecessary" quilt I have ever made.  And the most fun!  It all just fell into place so instinctively, and I enjoyed every minute of the process.  Let's face it, normally I utter more than a few curse words in the quilt-making process,  but this one was smooth sailing!


Truth be told, I don't even really like Halloween.  But when I was introduced to Alexander Henry's The Ghastlies while at Sewing Summit last fall, I loved it, and bought a half hard with no particular plans.  I started making some wonky blocks with it last fall, inspired by Thumbelina's quilt.  I thought I would just make a wall hanging, but as the blocks accumulated, I ended up with more than enough for a quilt, especially once adding the wonky border- this thing finished at 65 by 75 inches!

Once the top was made, I instantly had visions of quilting it with a large, sprawling spiderweb. The epicentre is to the top left of the quilt (you can click on the photo to enlarge and see the quilting better).  I used a thick Aurafil thread in a yellow-orange shade so that the quilting is quite pronounced.


 I used the same thread to topstitch the binding for continuity.


I even love the back- found this perfect spiderweb fabric at Fabricland on clearance for $3.50/meter.  Score!


It was Canadian Thanksgiving yesterday, and we headed out to rural Manitoba to have dinner with The Hubs' family.  This "Haunted House" is just down the road from their farm....all perfectly rusted and falling down!  Even the day was grey and rainy and desolate...perfect for photographing a Ghastly quilt.  I have to give a shout-out to The Hubs for climbing over barbed-wire fences, avoiding the multiple cow patties, and patiently holding this up in the rain while I gleefully took photos!


Wishing you a SPOOKTACULAR day!

Shared at Quilt Story and linked up to A Ghastly Gathering at alidiza, which runs until October 28!

A Ghastly Gathering!

Thursday, September 27, 2012

Ghastlies quilt top

I had never even heard of The Ghastlies until I was let loose on a bunch of genuine quilt shops in Salt Lake City during Sewing Summit last year.  I am not much of a Halloween person, but when I saw this fabric I couldn't resist picking up a bit, just in case.  I managed to put together a couple blocks last fall and decided to pull it out again to see if I could make some progress this year before Halloween came and went again.  My intention was to make a wall hanging for our front door, but I was having too much fun and soon amassed more than enough blocks for a full quit!


I did the individual blocks with no rules or measurements in mind, just added fabric until I felt they were fun.  I added some purples, pinks and marigold oranges from my stash for pops of color along with the greys and blacks, and I love the combination.  I spliced the blocks all together very free form with some Alexander Henry Heath (I am sure there is an easier way to do this than what I did) and then decided to frame the collection with a wonky border in the coordinating fabrics.

Some of my favorite characters! Of course the knitting sisters are featured in there :)


Even spliced a few extra ghastly folks in along the borders.


I had fun every minute making this quilt top.  Now to decide on some fun quilting...I am thinking spider webs??

Monday, March 5, 2012

more.

Like I needed more fabric.


But look what followed me home. Big chunks of fabric, justified as quilt backings. They were on sale, after all! And the perfect grey dot....for only $5 per meter!! It would have been wrong not to gobble up that deal. Wrong, I say!

The gingham I bought thinking it would be the perfect back for my Children at Play pinwheels...but not working for me. I continue to dislike this quilt top! Maybe I should just pack it away for a couple years instead of trying to resurrect it! On the plus side, I can see the gingham pairing well in color and style with my granny squares!


Oh yah. And then there was this:


The lastest DS quilt line from JoAnn's, and probably my favorite yet. Greys and yellows?!? Yah, baby! Courtesy of my fabric mule, Kaelin :) She keeps me in supply!

One more big stack of Flea Market Fancy reprint on its way, then....well, the plan is to stop buying fabric for a bit. We'll see ;) I really have a hankering for some of that Vintage Modern.......

Friday, March 2, 2012

fly, butterfly: a memorial quilt

My husband grew up in a small town; the kind where one group of 25 kids go through K-12 together, so they get to know each other pretty well. One of his classmates was Rebecca. I have met her a handful of times, and by some luck of fate she found me online via this blog and we chat from time to time. She is one with a golden heart- when I started to knit last year, she sent me a surprise package of knitting gift tags in support.

Last week I read the terrible news that Rebecca had suffered an unexpected stillbirth of her second child, a daughter. As a parent, or just as a human being, I am sure none of us can imagine anything worse than losing a child.

She has been on my mind and in my heart, and I wanted to provide some comfort. In the obituary for Olivia, they mentioned that donations were being accepted for a bench in a local butterfly park in her memory. "Fly, fly our little butterfly," the notice read. From these words, inspiration for a butterfly quilt was born. Something the family could keep in memory of the baby that they could not.


Simple. Grey for the grey skies that they are facing. A smattering of cheery pink butterflies making their way across the sky...and one wee butterfly veering off on her own path. Framed in a binding with cheerful flowers, to symbolize hope, a silver lining. Pink loopy quilting, like butterflies in flight. A few words incorporated into the loopy quilting...."Olivia," "fly" and "love."


More fluttering butterflies abound of the back, a great print by Valori Wells which was literally in my very first fabric order a couple years back....been hoarding it for awhile waiting for the perfect project.


The back also has a label and a quote, which I thought both lovely and appropriate to the situation:

The butterfly counts not months by moments, and has time enough.
-Rabindranath Tagore


I hope that the quilt can provide a small bit of comfort for Rebecca and her family during this heartbreaking journey.


Quilt stats:

Finished size: 26" by 31"
Design: inspired by this quilt. Butterflies from this template, raw edge appliquéd.
Fabrics: backing is Valori Wells Monarch, front scraps of Nicey Jane, Hunky Dory, DS quilts, Children at Play. Grey solid from local quilt shop.
Binding: Children at Play Meadow
Quilting: loopy stipple in pink cotton thread (note- tried this with my feed dogs up this time as I have seen others try, it worked great!)
Label: I used this product (first time, and I was quite pleased with it!)

Friday, February 10, 2012

Homecoming mail!

We are home from Disney World! We had a fantastic trip!! I promise to subject you all to a long drawn out post once I get my thoughts and photos together. In the meantime, I had some other goodies to show off. I was excited to come home to a lovely pile of crafty mail! Zip-a-dee-do-dah! ;)

When Krista asked me if I would be willing to do a swap for one of my cable knitted hats, I jumped at the chance. I prefer impromptu private swaps among blogging friends far more than the organized group variety, and I love Krista's work, so I knew I was in for a treat. I requested an armrest pincushion made from Amy's tutorial. One of those things on my bucket list for ME, so of course I never get around to making it.

She did an awesome job! I love, love, love it. I adore the Enchino fabrics, and the thick quilting thread really makes it pop. She even included a box of pins, in case I ever get over my aversion to, well, pinning stuff ;)

This will be the perfect partner as I do some hand stitching while catching up on some t.v. by the fire during the winter months. My husband will be pleased that he no longer needs to pluck stray pins and needles out of his arse. Lots of little pockets for scissors and measuring tape and such. The only thing it is missing is a place for my beer, but fear not! That is why God invented the beer helmet. Hands free beer-slugging awesomeness. I sent the cabled hat (which, sorry Krista, does not hold beer) on its way along with a package of those goofy "This took forever" tags and a little sewing magnet. I think it looks so cute on her! Thanks for a wonderful swap, Krista!
(pssst- I stole this picture from Krista's post)

I also got a big box-o-fabric from one of my favorite fabric mules, Kaelin. You know, that really loud chick in the neck brace? She is such a Temptress, with her destashing sales! I couldn't say no to this bundle of Denyse Schmidt Country Fair home dec fabric. Really- how could I be expected to resist? I also bought some Heather Ross Princess and the Pea...will incorporate it into my daughter's bed quilt that I will (eventually) get around to sewing up! You guys are going to demand some substance to this blog eventually, I'm sure ;) Also in the box....a beyond adorable but top secret handmade gift from one of Kaelin's upcoming patterns......filled with chocolate, no less. Thanks, Kaelin!!

And finally, Little Island Alison spoiled me with yet another set of those highly addictive Mollie Makes magazines! Am looking forward to a quiet moment to peruse. Do those moments exist???

Have a good day, friends :) It's good to be home again!

Monday, January 23, 2012

Tutorial: iPad 2 sleeve


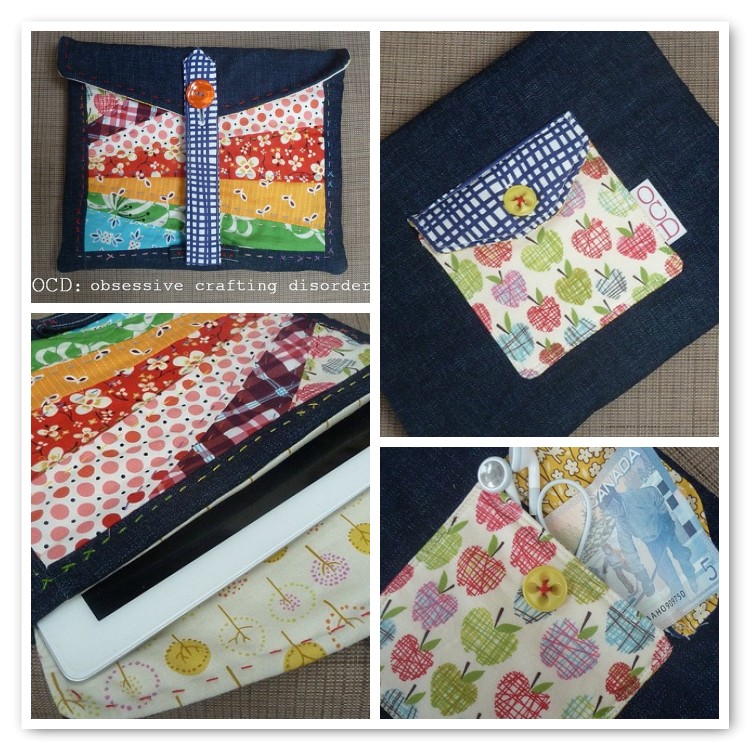
I am loving my new iPad, and it needed a home. So I made it this cozy quilted cover! It features a padded main compartment with a loop strap closure to securely hold your iPad inside. On the back I have added a convenient pocket, just the right size to stash some cash, your charger or some earbuds.Do you want a new sleeve, too?


You will need:

A fat quarter of home decor weight fabric for the exterior
A fat quarter of quilting cotton or other fabric for lining
A fat quarter of fusible fleece interfacing OR you can use scraps of quilt batting like I did :)
Scraps of coordinating fabric for pocket
Long piece of coordinating fabric for strap (15" by 4")
2 coordinating buttons
Thread


Cutting your pieces:

This pattern can be easily adapted for the original iPad, laptops or Kindles, etc. For thin devices, add 1.5 inches to the length and width of your device. If your device is thicker than 0.5 inches, then increase proportionately. Email me if you need any help with the calculations!

Here are the instructions for an iPad 2:

Exterior fabric, interior fabric and batting:
Cut two pieces from each measuring 11" wide by 9" tall. If you like, you can piece the exterior front panel like I did to a final size of 11" by 9" and use that!


Cut one piece from each for the exterior of the flap measuring 11" by 4". Fold in half width wise and trim at an angle (see photos and instructions below for back pocket flap).
Loop: cut piece measuring 2" by 3.5 " from exterior fabric, or coordinating scrap if you wish

Strap:
cut piece measuring 15" by 3" from each both the strap fabric and batting.


Pocket:
For pocket body, cut one piece measuring 5" by 5" from each of the exterior and lining pocket scraps/fabrics and batting. Then cut exterior fabric, lining fabric and batting measuring 5" by 3" for pocket flap.

To make angles for pocket flap and sleeve flap:
Fold exterior fabric in half width wise (i.e. for pocket flap, fold the 5" end and for sleeve flap, fold the 11" end). This is done to ensure that the angles will be symmetrical.

Cut off fabric from one corner at an angle as shown. I started a small amount away from the folded corner so that the flaps would be flat at the bottom and not pointed, then angled to the flap outer edge. In the photo below (showing the pocket flap), I started 0.5 inches from the folded corner and angled back to about 1 inch from the corner of the outer edge. For the sleeve flap, I started 0.75 inches from the folded corner and again angled it to 1 inch from the outer corner. This is NOT precise, only a guide, so don't panic, you can make this angle whatever you would like! It will look great!

Once you have made the angle on the outer fabric, you want the other 2 layers to match. To do so, use the cut layer as a template, placing it on top of the other 2 layers to cut as shown:


Unfold, and you will have 3 identical flap pieces like these:


Assembly:

* All seams are 1/4 inch unless otherwise noted*

Make pocket:
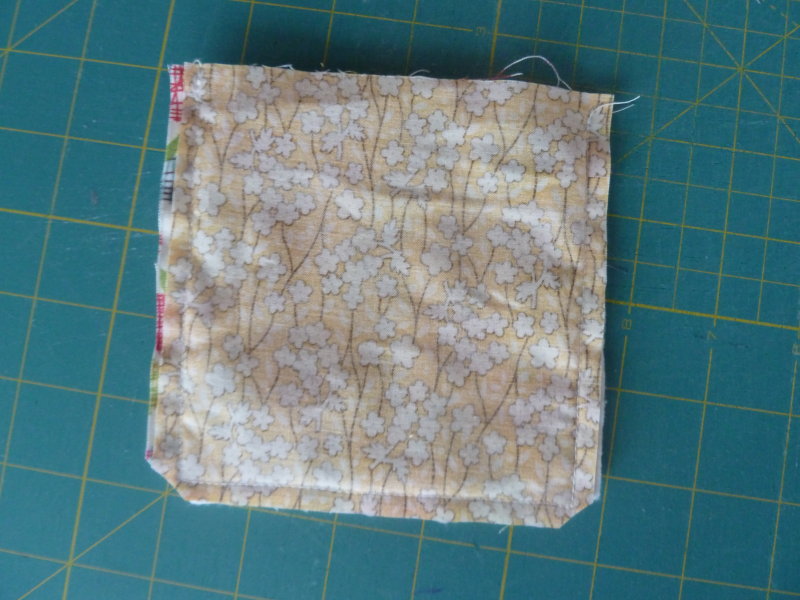
Make fabric sandwich starting with batting, then exterior right side up, followed by lining right side down. Sew on 3 sides leaving the top open.

Use opening to turn right side out. Tuck in raw edges.

Press and top stitch.
Do the same for top flap of pocket. Add button hole of appropriate size to flap centered near bottom of flap using button hole function on sewing machine (refer to your machine manual, or visit the Sew Mama Sew tutorial here).

Pin pocket to back exterior panel. I layered it with the batting so that attaching the pocket would sew through all layers for added security. Insert a label if you would like!


Sew on along two sides and bottom, leaving top opening of pocket unsewn. Pin flap to exterior, sew on along top edge. I did this twice- once with the flap in the "up" position as pinned in the above photo, then I flipped it into the "down" position and top stitched it in place as shown below:


Make loop:
Take loop fabric and fold in raw edges along length to center. Press. Then fold in half along center line as shown:
Stitch along both sides:

Fold raw ends under and attach to bottom center or front exterior flap. Do some quilting of the exterior front flap by hand or machine with the batting layer, if desired.


Sewing sleeve exterior:
Make sandwich as follows: exterior back (facing UP), exterior front (facing DOWN), batting.

Sew along two sides and bottom, leaving top open. Turn right side out.
Sewing lining:
Arrange lining pieces, right sides facing. Sew along two sides and bottom as for exterior, but leaving 3 inch opening in bottom center.

Make strap:
Align strap batting on wrong side of strap fabric. Fold in half lengthwise with batting facing outward. Sew along raw edge.

Turn right side out (I do this using a safety pin, as seen in this tutorial) and press with seam along one side. Tuck raw edges in at one end- I did mine so that it came to a point, but it could be square or any shape you wish. Top stitch close to edge around all sides. Add a button hole of appropriate size approximately 2 inches from the end.

*Note: It is a good idea to refrain from adding the button hole to the strap until the final step, to verify its position once the sleeve is completed. Run the strap through the loop and back up, with your iPad in place, to accurately measure where to place the button hole. Otherwise, you could end up with a strap that is too long or short!

Note: the other end of the strap can remain raw as it will be sewn inside the flap.

Sewing the sleeve flap:
Make flap by assembling fabric sandwich as shown below: batting, exterior right side up, strap with raw end aligned in center of the flap bottom edge and button hole end pointing to top edge of flap, lining right side down. Sew along sides and bottom edge, leaving top edge open. Turn right side out.
Press, and top stitch by hand or machine along 2 sides and bottom edge.


Attaching flap and finishing sleeve:
Align flap with exterior fabric facing exterior of back of body. Sew with quarter inch seam to attach (Note- be sure to sew to back layer fabric only!).

Insert exterior bag, which is facing right side out, into lining, which is inside out. Tuck in flap and strap.

Sew with half inch seam all around the top edges.


Turn right side out via the hole you left in the lining.

Tuck raw edges of lining opening in and press. Sew closed along edge as shown.


Hand stitch buttons in place in proper relation to button holes. Measure and prepare strap button hole as discussed above.


You're done!


I hope you have enjoyed my iPad sleeve tutorial. Any questions? Email me at obsessivecraftingdisorder@yahoo.ca and I will be happy to help.

As always, my tutorials are copyrighted for personal use only. I donate many hours of my time to prepare this pattern for your use, so please be courteous and give credit where credit is due- link back to me if you blog about your newly made sleeve. I'd love to see your creations! Be sure to hook 'em up to my Flickr group! :)