Awhile back, I picked up a set of some cute Japanese polka dot fabric, with some sheep in the polka dots. Right away, I was thinking these prints would be perfect for a knitting project bag (or any type of project for that matter).
With the end of the school year drawing near, I have decided to make some gifts for my kids' teachers, one of which is a knitter! I decided to use this fabric to make a drawstring bag, and give a skein of pretty sock yarn along with it. I named the bag the "sheep happens" bag, and it turned out so nicely that I thought I would make a tutorial to share with you here!
The bag is made of linen and cotton on the outside, and is lined with cotton. It is round bottomed, therefore can sit nicely on its own without toppling over, and the drawstring closure doubles as a handle. It came together quickly, and is the perfect size for small projects.
And here is how you can make your own!
Materials:
fat quarter of linen or home dec fabric for outer
fat quarter of cotton for inner
30" of pretty ribbon, 3/4" wide
Thread, etc
Cut:
6" x 21" of sheep fabric
6" x 21" of linen, sub cut into a 4" x 21" piece and a 2" x 21" piece
11" x 21" of lining
two circles of 6.5" diameter, one of each outer and lining fabrics (I used a bowl as a template)
Assembly:
NOTE: I used 1/4 seams, not the traditional 1/2" for bags. Because I am a quilter, after all ;)
1. Sew outer pieces, right sides together, along long sides such that the 4" strip is on the top, and the sheep piece is in the centre. Press seams.
2. Fold outer and lining, right sides together so that short raw edges are aligned.
For lining, sew along short side to make tube.
For outer piece, do the same, but stop sewing 3" from top. Backstitch. Leave 1" gap, and sew remainder of side to top. Flip to right side, finger press seams at gap away from hole, and sew short lines on either side of the hole to secure. This will be where the drawstring ribbon exits.
3. Press outer and lining tubes in half, and then in half again. Press along bottom edge to mark quarters. Do the same with the circle pieces (see photo).
4. Align circles with bottom of tubes, right sides together, matching and pinning the four creases around the circle.
5. Sew circles to tubes, working fabric from tube along circle's curve and ensuring that all 4 pinned corners line up.
6. Insert outer, right side out, into lining, wrong side out (i.e. right sides will be facing each other). Ensure side seams for the outer and lining are aligned. Pin, if desired.
7. Sew along top, leaving 2" hole for inverting.
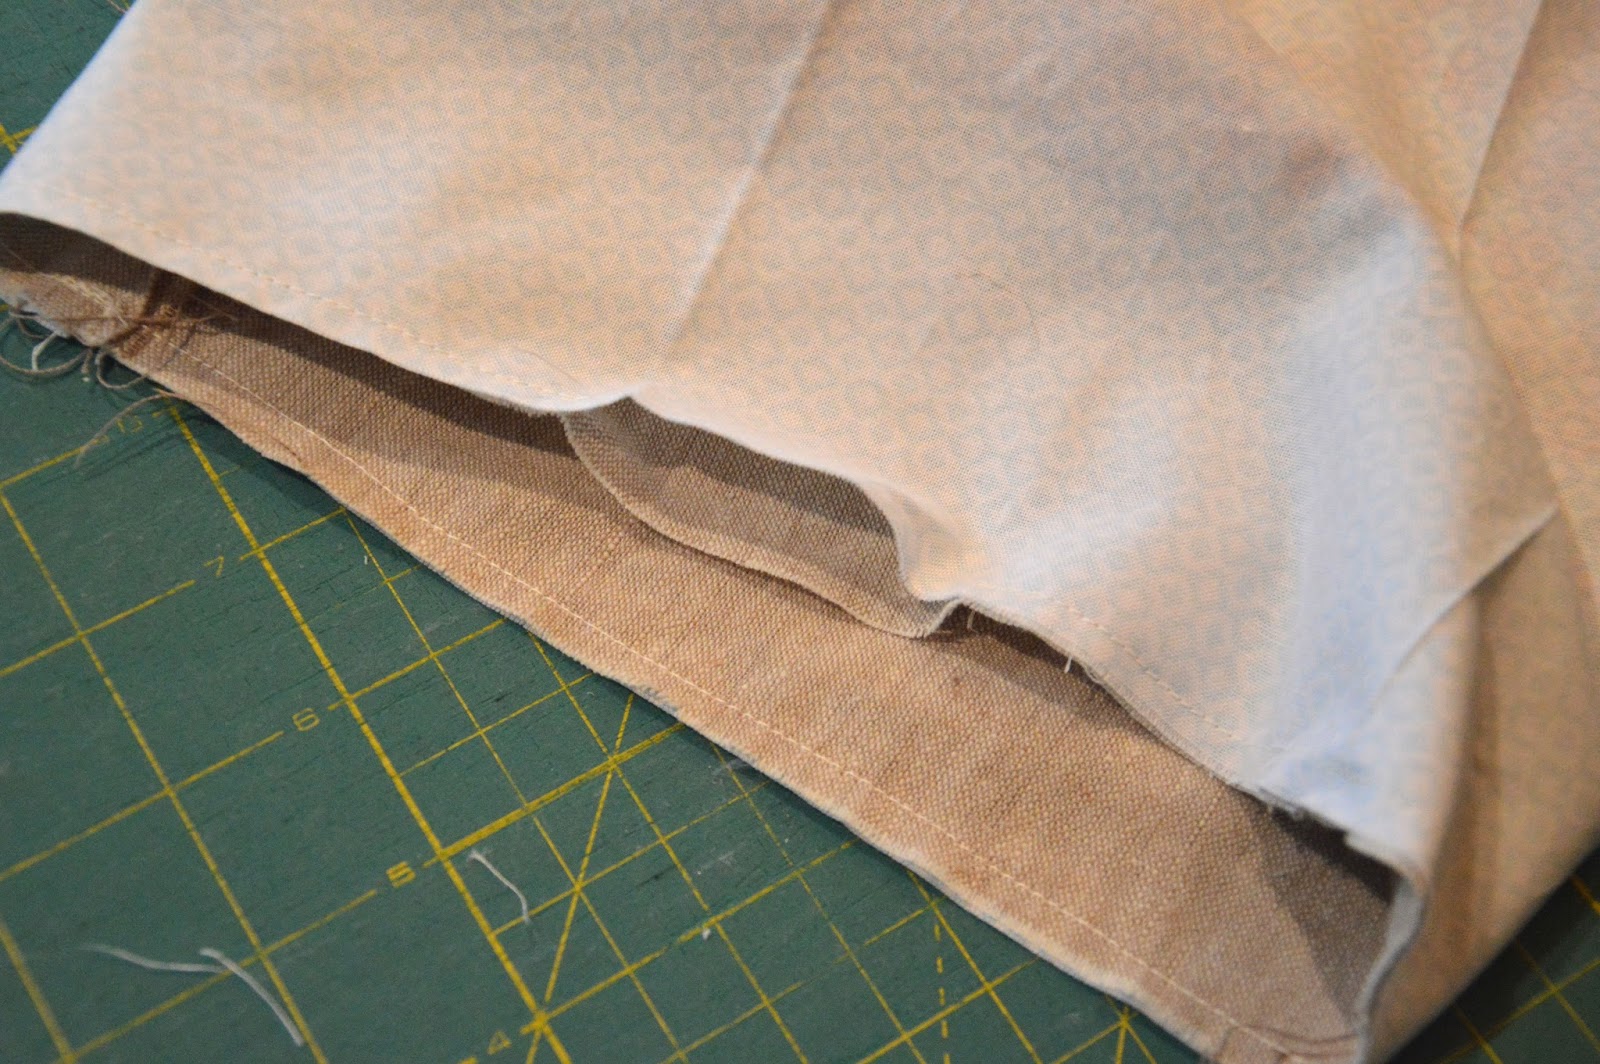
8. Turn bag right side out and press top seam. Top stitch along top, close to the edge, to close the hole. Also topstitch on either side of ribbon hole to make channel for the ribbon as shown.
9. Turn edges of ends of ribbon over and stitch to prevent fraying. Secure large safety pin to one end and insert into hole.
10. Using your fingers, pull safety pin along the channel until the ribbon emerges out the other side. Tie ribbon ends into a knot.
Ta da! You have yourself a Sheep Happens project bag. Now go make something else to stick in it!!
Giveaway:
Wanna win a sheep happens bag? I am giving one away on Instagram today, Friday June 20. Come check out my feed for details (kristieocd). If you aren't on IG, leave a comment here before 3 PM (Central time) and I will enter you. Have a great Friday!
Showing posts with label bag. Show all posts
Friday, June 20, 2014
Thursday, May 22, 2014
personalized tote
My friends's daughter is a crafty little thing (and by crafty I mean likes to make crafts, not devious). I had previously sent her the Crafty Chloe book, illustrated by Heather Ross, as a gift, and decided to make her a Crafty Chloe tote, filled will art supplies, as a birthday gift.
A band of crafty Chloe fabric across the top, and some girly echino polka dots for the body. Lined with Crafty Chloe, too!
I personalized the tote with her first initial for added fun. A sweet, quick gift!
A band of crafty Chloe fabric across the top, and some girly echino polka dots for the body. Lined with Crafty Chloe, too!
I personalized the tote with her first initial for added fun. A sweet, quick gift!
Tuesday, December 17, 2013
dancing cargo duffle
I made dance totes for my kids several years ago, which I still love. But The Middle Child has since advanced to a competitive dance troupe, and spends many hours at the studio per week. She needed a bigger bag for all of her gear. And a handmade dance bag was one of the only things she requested for Christmas. Like a crafting mama needs any further prompting??
Then Anna of Noodlehead released her Cargo Duffle pattern for Robert Kaufman. Not only is it fabulous, it is FREE (thanks, Anna!). I NEEDED to make one, and A + B = Dance Cargo Duffle.
I modified it slightly, making it smaller in width by about 2 inches, which still provided oodles of room. I also only did one cargo pocket as I only had a small scrap of my favourite Japanese ballerina fabric left, which I used for the pocket flap. L-O-V-E.
The bag is quilted in a quilt-as-you-go manner to achieve its structure. The top half I quilted in straight lines (well, as straight as I can manage), and for the bottom portion I did a combination of freehand swirls and pebbles. The raw sedges inside the bag are then covered with bias tape. I had a half genius idea to cut my lining pieces a half inch larger on each side to allow fabric for fold over to cover the edges without bias tape. I say "half genius" because if I was really smart, I would have allowed a full inch for a double fold cover….a bit of pulling and coaxing was required, but it all worked out well!
I used a variety of girly fabrics for this bag- a wee floral from Tasha Noel's Little Red Riding Hood, a bit of Aneela Hoey Cherry Christmas, some Camille and Bonnie Bliss, a Riley Blake stripe, and some Essex linen to round things out, all from my stash. Which I have to say, only encouraged me further to justify my ridiculously out-of-control fabric hoarding….love how I had all these fabrics on hand that went together so perfectly!
I think my very favourite detail is the personalized label on the side panel, using printable fabric. Super cute and prevents other jealous ballerinas from trying to pinch her bag ;)
All in all, I expect to have a very happy little girl dancing around the tree on Christmas morning!
Labels:
bag,
ballerina,
Cargo Duffle,
dance,
free motion quilting,
handmade tote,
Noodlehead,
sewing
Wednesday, March 20, 2013
Sew-vivor: Round 1 Emerald Challenge
Well, today is the day that the Emerald Challenge items are revealed for the top ten Sew-vivors! This is my first sewing competition and I was feeling a little awed by the talent of my competition, so I knew I would have to think of something special. Luckily inspiration came quickly for me, and I am very happy with my project! Although there is something fishy about it.....
I decided to use the green as scales for this cute little fish pouch! I have had this idea rattling around in my head for a couple years, when I bought a similar backpack style fish bag for Big G in a market in Italy, and have seen some variations since on Pinterest. This challenge was the proding I needed to get it done!
The drawstring closure can be pulled on both sides for a shorter wristlet strap, or pulled to one side for over-the-shoulder wear. And the drawstring doubles as a fishy mouth :)
Lots of room for a phone, change purse, keys and all sorts of treasures inside!
This little fishy was instantly claimed by The Middle Child.
I am sure the other contestants will be bringing all sorts of talent to this challenge, so hop over to Family Ever After, take a look and cast your vote! Voting is open now through Friday evening, and the five who advance will be announced next Wednesday. One vote per device :) Thanks so much and wish me luck!
I decided to use the green as scales for this cute little fish pouch! I have had this idea rattling around in my head for a couple years, when I bought a similar backpack style fish bag for Big G in a market in Italy, and have seen some variations since on Pinterest. This challenge was the proding I needed to get it done!
The drawstring closure can be pulled on both sides for a shorter wristlet strap, or pulled to one side for over-the-shoulder wear. And the drawstring doubles as a fishy mouth :)
Lots of room for a phone, change purse, keys and all sorts of treasures inside!
This little fishy was instantly claimed by The Middle Child.
I am sure the other contestants will be bringing all sorts of talent to this challenge, so hop over to Family Ever After, take a look and cast your vote! Voting is open now through Friday evening, and the five who advance will be announced next Wednesday. One vote per device :) Thanks so much and wish me luck!
Labels:
bag,
competition,
fish,
fish bag,
fish pouch,
pouch,
Sew-vivor,
sewing,
tote
Monday, March 11, 2013
yoga bag of Awesome
I don't mean to brag, BUT.... I made something Awesome.
There is a story behind it, naturally.
I decided to give yoga a try. I am getting older and all, and figured it would be good to stretch my bones. I opted for the popular Moksha Hot Yoga studio. Any workout that has you in a sauna-like room in the dead of frosty winter and includes mat time to lie down and relax is A-okay with me!
Part of the whole yoga practice is to clear your mind. Well, all through my first hour of class, all that was rattling around in there was: "Hey, don't I have a scrap of that Heather Ross munki munki yoga fabric somewhere?" From there it was end of story. As IF I could focus. All I could do was design a yoga bag in my head. I NEEDED one.
Okay. I might have a problem. Fortunately, this problem often results in pretty things :) And this groovy new bag ensures that I will be attending yoga classes for some time!
So about that bag. Boy, did I have fun with the details of this. I paired some Essex yarn dyed linen in black with the Heather Ross munki munki and an assortment of my favorite purple fabrics. The outside of the bag features a zippered patchwork pocket on the front, just the perfect size for my keys, phone and money. I hand-stamped the word "breathe" on one of the squares and added some hand stitching.
Above the pocket, I added a fussy cut of a you girl thinking of a martini :)
I also used accent fabrics for a side pocket, with a second fussy cut of a yoga girl thinking of pretty shoes. Those girls make me smile! The side pocket is pleated and has an elastic at the top to allow room for an extra large water bottle.
The front and back panels of the bag extend to cradle my mat, which is secured on top with an adjustable strap.
And if I don't need my mat, there is a hidden pocket in the lining that I can retract the strap into! I am crushing on the funky black and purple zippers I found for 70% off (!!) at my local Fabricland.
For the straps I used some natural webbing, with an accent strip of Essex down the centre. The perfect length for slinging over the shoulder. On the back of the bag, I included a horizontal strap perfect for slipping over the handle of a rolling suitcase, as I think this bag would make the perfect sized travel carry on!
Inside, I lined the majority of the bag with a washable waterproof fabric, perfect for those damp towels! There is a large dry pocket as well, lined with some Denyse Schmidt Hope Valley, that includes a second zippered pocket. The interior of this bag has plenty of space for my workout clothes, a shower towel, a large mat towel, a bag of toiletries, shower flip flops and sneakers. Yup, she's big!
So that is the story of my new shiny yoga bag. And I am so proud of her, I decided to enter her in a couple competitions :)

There is a story behind it, naturally.
I decided to give yoga a try. I am getting older and all, and figured it would be good to stretch my bones. I opted for the popular Moksha Hot Yoga studio. Any workout that has you in a sauna-like room in the dead of frosty winter and includes mat time to lie down and relax is A-okay with me!
Part of the whole yoga practice is to clear your mind. Well, all through my first hour of class, all that was rattling around in there was: "Hey, don't I have a scrap of that Heather Ross munki munki yoga fabric somewhere?" From there it was end of story. As IF I could focus. All I could do was design a yoga bag in my head. I NEEDED one.
So, the score goes something like this:
5 hours of yoga classes (to date)
15 hours of yoga bag making
Okay. I might have a problem. Fortunately, this problem often results in pretty things :) And this groovy new bag ensures that I will be attending yoga classes for some time!
So about that bag. Boy, did I have fun with the details of this. I paired some Essex yarn dyed linen in black with the Heather Ross munki munki and an assortment of my favorite purple fabrics. The outside of the bag features a zippered patchwork pocket on the front, just the perfect size for my keys, phone and money. I hand-stamped the word "breathe" on one of the squares and added some hand stitching.
Above the pocket, I added a fussy cut of a you girl thinking of a martini :)
I also used accent fabrics for a side pocket, with a second fussy cut of a yoga girl thinking of pretty shoes. Those girls make me smile! The side pocket is pleated and has an elastic at the top to allow room for an extra large water bottle.
The front and back panels of the bag extend to cradle my mat, which is secured on top with an adjustable strap.
And if I don't need my mat, there is a hidden pocket in the lining that I can retract the strap into! I am crushing on the funky black and purple zippers I found for 70% off (!!) at my local Fabricland.
For the straps I used some natural webbing, with an accent strip of Essex down the centre. The perfect length for slinging over the shoulder. On the back of the bag, I included a horizontal strap perfect for slipping over the handle of a rolling suitcase, as I think this bag would make the perfect sized travel carry on!
Inside, I lined the majority of the bag with a washable waterproof fabric, perfect for those damp towels! There is a large dry pocket as well, lined with some Denyse Schmidt Hope Valley, that includes a second zippered pocket. The interior of this bag has plenty of space for my workout clothes, a shower towel, a large mat towel, a bag of toiletries, shower flip flops and sneakers. Yup, she's big!
So that is the story of my new shiny yoga bag. And I am so proud of her, I decided to enter her in a couple competitions :)

Tuesday, November 13, 2012
so this chick walks into a quilt retreat...
So this Chick walks into a quilt retreat, and the Girls are all like, "Chick, where did you get that rocking bag?" and the Chick is, like, "Girls, I made it." And the Girls are like, " No way!' and the Chick says, "Way!" They were impressed by her mad style, righteous color choices and the ever so snazzy silver pleather handle and bottom.
And then of course they rejoiced once aware of the copious amounts of fabric and yarn the bag could hold!
Next, there may have been some merry hoopla and fist pumping and maybe even some chicken dancing, but who could say for sure, because it was a QUILT RETREAT after all, and so of course there was a lot of alcohol involved.
True story. {I think}
More tall tales of quilt retreat adventures to follow, stay tuned, you aren't gonna want to miss these ;)
And then of course they rejoiced once aware of the copious amounts of fabric and yarn the bag could hold!
Next, there may have been some merry hoopla and fist pumping and maybe even some chicken dancing, but who could say for sure, because it was a QUILT RETREAT after all, and so of course there was a lot of alcohol involved.
True story. {I think}
More tall tales of quilt retreat adventures to follow, stay tuned, you aren't gonna want to miss these ;)
Labels:
bag,
Loon Lake,
quilt retreat,
quilted bag,
scrappy,
tote
Monday, September 17, 2012
baby knit eyelet hat pattern

When I made this cute baby shrug, I had just enough yarn left over for a sweet wee hat. I decided to make up a pattern that matched. As promised, I am sharing it with you!
Size: 3 months (6-12 month, 1T-2T)
To fit head size: 14-17" (16-19", 18-20")
Materials: Tanis Fiber Arts Green Label yarn in natural, 50 (100, 150 yards)
needle: circular US size 8/ 5mm (I used a 40" circular and used the magic loop method)
Stitch marker
tapestry needle
Gauge: 4.5 st/inch
Abbreviations used:
st: stitch
K or k: knit
k2tog: knit two stitches together as one (decrease)
P or p: purl
YO: yarn over (increase)
BO: bind off
Pattern:
Cast on 60 (66, 72) st.
Place marker and join in the round, being careful not to twist stitches.
Row 1-6: *K1 P1, repeat from * to end of each row (1x1 ribbing).
Row 7 (Eyelet row): *K1, YO, k2tog, repeat from * to end of row.
Knit in stockinette (knit every stitch) until hat measures 4.5 (5, 6.5) inches from cast on edge.
Begin Decreases to shape top of hat:
Row 1: *K4, k2tog, repeat from * to end of row. 50(55, 60) st.
Row 2: knit all stitches
Row 3: *K3, k2tog, repeat from * to end of row. 40(44, 48) st.
Row 4: knit all stitches.
Row 5: *K2, k2tog, repeat from * to end of row. 30(33, 36) st.
Row 6: knit all stitches
Row 7: *K1, k2tog, repeat from * to end of row. 20(22, 24) st.
Row 8: knit all stitches.
Row 9. k2tog to end of row. 10(11,12) st
Row 10: knit all stitches.
Row 11: k2tog to end of row. There will be one extra stitch for the 6-12 month size hat; knit it. 5(6, 6) st.
Thread tail of yarn through remaining stitches and pull tight.
Weave in ends and block.
Friday, May 27, 2011
Denyse Schmidt clutches
My quilting "to-do" list is looooong, but I just had to crack into some of that gorgeous new Denyse Schmidt fabric from JoAnn's. Couple that with my new obsession with framed purses, and here you have it:

I used the tutorial at U-handbag to make my own pattern, using these cute frames- love the aqua bobbles! In typical OCD style, I bought a mother-load of various frames on etsy here and here, so be prepared to be bombarded over the next weeks until I get this out of my system ;) Remember my embroidery hoops phase?? (here here here here here and here)
I simply love how these framed bags look, and the endless possibilities! These ones are 8 inches wide, the perfect clutch size, or can be thrown like a pouch into a bigger tote.


I lined each with coordinating fabrics from my stash, and included my new labels bought from Mommie Made It.


Not sure yet how I will slice the rest of these babies up, but Denyse did it again- these are truly pretty prints :-)

Lining up at Sew Modern Monday and Fabric Tuesday.
I used the tutorial at U-handbag to make my own pattern, using these cute frames- love the aqua bobbles! In typical OCD style, I bought a mother-load of various frames on etsy here and here, so be prepared to be bombarded over the next weeks until I get this out of my system ;) Remember my embroidery hoops phase?? (here here here here here and here)
I simply love how these framed bags look, and the endless possibilities! These ones are 8 inches wide, the perfect clutch size, or can be thrown like a pouch into a bigger tote.
I lined each with coordinating fabrics from my stash, and included my new labels bought from Mommie Made It.
Not sure yet how I will slice the rest of these babies up, but Denyse did it again- these are truly pretty prints :-)
Lining up at Sew Modern Monday and Fabric Tuesday.
Labels:
bag,
clutches,
Denyse Schmidt,
framed purse,
handmade purse
Subscribe to:
Posts (Atom)


