
 It's been a busy blogging week celebrating my favorite accessory, and I thought I would wrap it up with another tutorial. These bags made me so happy, I had to share the pattern. These are great, for business or pleasure. They are a bit more work than your average project (at least for me), so allow yourself about 3-4 hours to cut and complete. I think they are worth the effort!
There are 2 sizes. The "regular" messenger finishes up around 15" wide by 10" high and is 3" deep. Perfect for binders, clipboards or laptops: The "mini-messenger" is more purse-sized, measuring 9" wide, but is still 10" tall and 3" deep:
You will need:
2/3 yard outer fabric- such as wool, wool blends, suiting, canvas
2/3 yard of lining fabric- cotton quilting weight
2/3 yard of interfacing- I used fleece sew-in for a well padded heavier bag
For the "Mini-Messenger":
1/2 yard each of above
For both-
thread color of choice
2 buttons of choice
hardware for adjustable shoulder strap- 1 slider and 2 rings as shown (size 39mm/1.5"):

Cutting your pieces
"Regular Messenger":
Outer fabric pieces:
front and back panels- 15.5" by 10.5" (cut 2)
flap: 15.5" by 10" (cut 1)
back pockets: 15.5" by 9.5"
sides and bottom: 15.5" by 3.5" (cut 1 for back) and 10.5" by 3.5" (cut 2 for sides)
loops for rings : 3" by 2.5" (cut 2)
Lining fabric pieces:
front and back panels- 15.5" by 10.5" (cut 2)
flap: 15.5" by 10" (cut 1)
inner pockets: 15.5" by 6.5"
sides and bottom: 15.5" by 3.5" (cut 1 for back) and 10.5" by 3.5" (cut 2 for sides)
loops for rings : 3" by 2.5" (cut 2)
loops for buttons: 5" by 1.5" (cut 2)
Note- extend length of button loops if you are using very large buttons
Interfacing:
front and back panels- 15.5" by 10.5" (cut 2)
flap: 15.5" by 10" (cut 1)
sides and bottom: 15.5" by 3.5" (cut 1 for back) and 10.5" by 3.5" (cut 2 for sides)
Shoulder strap:
To make from fabric- cut 1 piece each of outer fabric and lining fabric
45" (or WOF) by 2.5"
OR
use 1-1/4" webbing (length 45")
OR
use a recycled belt, cut about 12" from where the strap attaches to the buckle
OR
get creative :-)
"Mini-Messenger":
Cut same pieces as above, but change all measurements that are 15.5" to 9.5"
Let's sew!
Note- all seams are sewn at 1/4", unless stated otherwise.
Additional note- please tolerate my sucky photos. I do most of my crafting in the wee hours of the night when my kids are in bed (no more nap times at my house!) so there is no natural light to be found. These are kind of washed out, but hopefully clear enough!
One Last thing- the following photos show the assembly of the mini messenger. Same rules apply for the big guy, just watch during the flap step that you put your button hoops on the long side of the flap fabric (not the short side).
1. Preparing the flap of the bag:
Take 2 button loop pieces. Fold over one long end 1/4". Press.
 Now roll it up, rolling 3 times, from the other end, until it looks like this:
 Sew along the edge to close. Set aside.
  Grab flap piece of lining fabric and set it right side up. On top, put the outer fabric, right side down. Put your interfacing on top.
  Make a loop with the button loop pieces you just made, and insert them into the sandwich, loop inward, about 4" in from the outer corner (1.5" in on the mini). Depending on the size of button you are using, allow more or less length for the loop- I think it looks best if the loop is snug on the button. Pin loops in place. If you are adding a label to the flap as I have done, insert it as well, ensuring that the words are facing towards the outer fabric and not the lining.
  Sew along the 2 side and bottom ends.
  Clip corners, trim excess, and invert flap piece. Push out corners, and press. Do some top stitching to snaz it up. Set aside.
2. Preparing the lining:
Take pocket piece and fold over bottom 1/4'. Press. Fold over top length 1/4", press, then fold again 1/2" and press.
 Sew along top only. I did 2 lines, one close to the folded edge and one 1/4' down.
 Add a label if you would like (if doing the mini like shown here, add the label to the lining body, not the pocket).
Pin the pocket piece to the lining back piece, about 4" from the top.
Sew along bottom edge now to close pocket, close to the fold.
 Sew vertical lines (I did double lines at 1/4" apart again, simply for style) to separate into pockets of the sizes you would like. In the regular messenger, I used 2 sets of lines equally spaced to make 3 pockets. For the mini, I divided it into 2 pockets, then added my label at this point, just above the pockets. Take the bottom piece of lining, place with right sides facing, and sew along raw edges.
Flip bottom piece aside, align 2 side pieces with right sides facing, sew.
 Align corners. Sew.

Repeat to add front piece of lining. LEAVE A 6" SEGMENT OF THE BOTTOM OPEN IN THE LINING AS SHOWN. You will need this hole to invert your bag as one of the final steps. Set your lining aside.

3. Preparing the outer body:
Take pocket piece and fold over top 1/4", press, then fold 1/2" and press again (note- with some of the heavier wools, this may not press well). Stitch along fold, and again at 1/4". Align on back body piece such that bottoms are in line. Pin in place. If doing regular messenger, mark center and stitch to make 2 pockets, and stitch in place. (Note- the mini is shown here with 2 pockets, but I found them too narrow to stick your hand down...for the mini, one pocket works best, so skip this step!).
Assemble the outer bag much like you did the lining, only include the layer of interfacing on the wrong side of your outer fabric. Also, do not leave a hole- close all seams. Be aware that sewing through 2 layers of wool and 2 layers of interfacing is one mighty thick sandwich!!

 Invert your outer bag.
 4. Putting it all together
Make the loops for your shoulder strap rings by aligning pieces, right sides facing, and sewing along long sides.  Invert, press, and top stitch along long sides. Set aside.
 Now it is time to attach the flap to the outer bag. Align prepared flap with outer side facing the back (pocketed) side of the outer bag, raw edges aligned. Pin, then sew. (Note- if you want to have the external pockets on the front under the flap, instead of on the back, then pin flap on opposite side. To-may-to, to-mat-o. You choose.)
 Thread rings over loops:
 Center loops (with rings inside) to sides of bag, on outside of bag with raw edges aligned. Pin and sew.
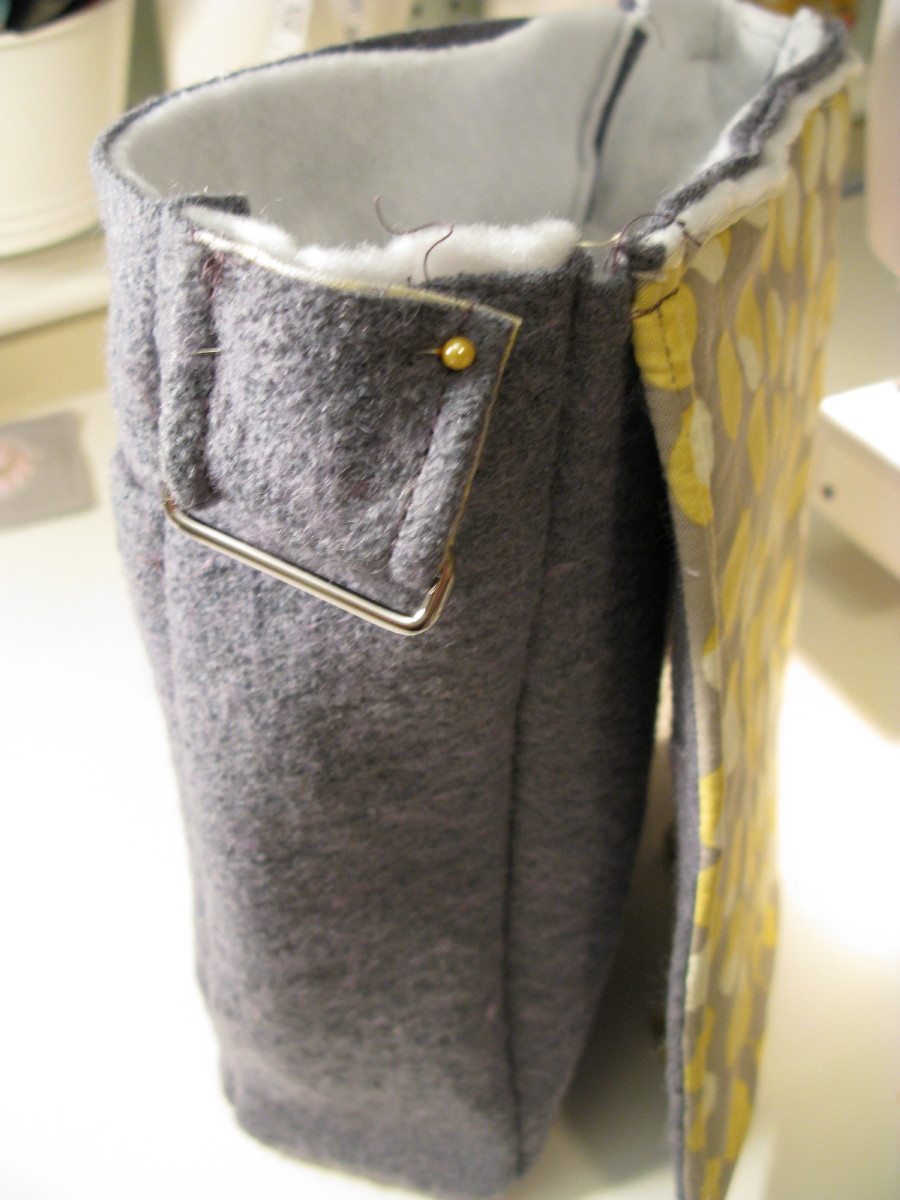 Grab your lining and invert. Slip over outer bag so that right sides are facing and the lining pocket is on the same side as the flap. Tuck flap and ring loops inside lining:
 Sew all around top to close:
 Remember that hole you left in the lining? Stick your hand through it and yank to invert this puppy!
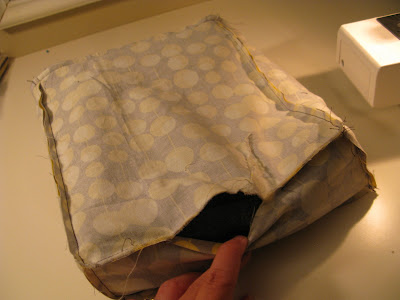 Tuck the open edges of the lining in on itself and sew it closed.
 Tuck all the lining nicely into the outer bag and press the seams. Top stitch around the top to help it stay nice and flat.
  Line up your button loops and hand sew on your buttons To finish the main body of the bag. You are almost done! Let's put on a strap.
5. Adding an adjustable shoulder strap:
Your strap can be made of the bag fabric, a recycled belt, or made of webbing. It you are making it from fabric, align pieces so right sides are facing, and stitch along length on both sides, leaving ends open. Invert the tube by attaching a safety pin to the lining fabric on one end, and snaking the pin through to the opposite end, working it with your fingers through the tube and pushing fabric back until the safety pin emerges on the other side:
 Press, then top stitch along length at 1/4".
Take your strap and loop through the center portion of your slider. Sew into place as shown:

Take the other end and thread it through the ring (left side, if looking at bag from the front) as shown: Loop it up and in one end of the slider from underneath:
 Loop it back over the other side and pull:
 Bring the other end to the right loop and thread around as shown:
 Tuck end in on itself and sew to secure as shown:
 You did it! You are done! Let me hear you say "Oh yah!" And maybe just a little happy dance.....
 I hope you have enjoyed the Messenger Bag Tutorial! I would love to see your beautiful bags, so please email me a photo or add one to my Flickr group! As always, my tutorials are intended for personal use only. Feel free to blog about your creations, but please be courteous and link back to this site so I can get credit for all my hard work and ideas. Happy sewing!
233 comments:
«Oldest ‹Older 201 – 233 of 233Don't go past my writing! Please read my article only once. Come here and read it once"크레이지슬롯
Many thanks for the article, I have a lot of spray lining knowledge but always learn something new. Keep up the good work and thank you again. 온라인슬롯
Buy Dexaphenylbutazone online
Buy Dexaphenylbutazone online
www.horsemedicare.com
Find the best medications for horses & large animals online at HORSE MEDICARE. We sell veterinary products online at the lowest price. Buy Dexaphenylarthrite online
https://horsemedicare.com/
Find the best medications for horses & large animals online at FirstHorse Vetcare. We sell veterinary products online at the lowest price. Buy Dexaphenylarthrite online
https://firsthorsevetcare.com/
Thank you so much for such a well-written article. It’s full of insightful information. Your point of view is the best among many without fail.For certain, It is one of the best blogs in my opinion. 먹튀검증
Great post. I am facing a couple of these problems.
https://fe-acc18l.ru/
feshop
Hi there
Nice post and blog, keep sharing the best content, hope to read more interesting articles like this one,
take care and regards
Your follower
Salvatore from Reservar Entrada Cataratas do Iguaçu
Thanks for giving us this wonderful information. This is very useful for buyers. After reading this awesome blog there is no confusion before buying.
Get Flat OFF
Mens Cotton Shirts Online
Get Flat OFF
Leather Weekender Bag
happy birthday to a special person This website provides you with free birthday greeting text messages with a great interface for your loved ones. There are more than 10,000 happy birthday wishes in our database.
Great and interesting article.Thank you for sharing.
standee banner
This blog is so nice to me. I will keep on coming here again and again.
buy tramadol 200mg online UK
Security Tamper Evident Bags are best for courier purposes because they protect your items and costly products and discourage courier people to open your package during transit. This ensures safety of your products.
sexy game ate more on practices than the theoretical approaches, while that makes writing quite difficult for medical student.
Good blog really, I read it, and keep posting. Five Design is the best website designing company in Rohini. If your business needs an online presence then you need to build a website according to your business, here at five design we create the best website design in Rohini. Five Design is known as the best website designing company in Rohini.
website designing company in Delhi
website development company in Delhi
Customized Side Bags in Panipat
Thank you for another great article. Where else could anyone get that kind of information in such a perfect way of writing? I have a presentation next week, and I am on the look for such information.
custom engraved metal pens
Very Nice and Knowledgeable content. Will create a lot of awareness among the people. If you want to create a visiting card design with your logo inbuilt in it, printed in both single and double sides, visit us.
This is the first female lead character in a Gundam series. In the timeline described in the prologue, mankind have relocated to space and are split into Speaceians and Eathians. Continue reading as I give you a thorough explanation of how to stream Mobile Suit Gundam: The Witch from Mercury from any location! watch Mobile Suit Gundam The Witch from Mercury series
The trajectory of success for boAt has been inexorable since it set sail in 2016. The brand is the most well-known in India and is ranked fifth worldwide.
Which BoAt Earphone Is Best always aims to provide its clients with cutting-edge, original, and premium items.
Poxet 30 mg is a medication used to treat premature ejaculation in men. This medication contains dapoxetine hydrochloride, which is a selective serotonin reuptake inhibitor (SSRI) that helps to delay ejaculation and improve sensual performance. You can buy Poxet 30 mg online. One of the positive aspects of Poxet 30 mg is its effectiveness in treating premature ejaculation. Clinical studies have shown that this medication can significantly increase the time it takes for men to ejaculate during sensual intercourse, allowing them to have more satisfying and pleasurable sensual experiences. Additionally, Poxet 30 mg is well-tolerated by most men, with few side effects reported. Another advantage of Poxet 30 mg is its convenience.
mymedshub
I like your content and I also add something Satta Matka, a popular form of gambling in India, has a rich and intriguing history dating back to the pre-Independence era. Originating in the bustling streets of Mumbai, formerly known as Bombay, in the 1960s, Satta Matka initially involved betting on the opening and closing rates of cotton transmitted from the New York Cotton Exchange to the Bombay Cotton Exchange.
Looking for top-notch web content that fit perfectly with your professional website design services? At QA Solvers, we offer affordable web design services especially curated to meet your business's specific needs.
The design of U panel bulk bags! facilitates easy stacking, maximizing warehouse space. Their stability allows for higher stacking, improving storage efficiency and optimizing logistics management for businesses.
Nice post!!
PP Leno Mesh Bags are fantastic for all types of packaging, from agricultural goods to hardware. The breathable design keeps items fresh, and the strength ensures they can handle heavy weights.
Eine Spendenaktion ist eine großartige Möglichkeit, Geld für wohltätige Zwecke oder dringende Bedürfnisse zu sammeln. Ob durch Online-Kampagnen, Benefizveranstaltungen oder kreative Fundraising-Ideen – jede Spende zählt! Mit einer gut organisierten Spendenaktion kann man viele Menschen erreichen und gemeinsam einen positiven Unterschied in der Gesellschaft bewirken.
https://whydonate.com/de/blog/spenden-sammeln-ideen/
Inke sattaking charts aur old record analysis se mujhe kaafi help milti hai. Pichhle results dekh ke main pattern samajhta hoon aur apna number select karta hoon.
Pehle mujhe daily result ke liye alag alag jagah dekhna padta tha, par ab main sirf Satta King visit karta hoon. Yahan par aapko har major Satta game ka real-time result milta hai, that too without ads or fake info.
अगर आप भी daily Satta Result में accuracy चाहते हैं, तो Sattaking की ये रिपोर्ट एकदम perfect है। Data और charts दोनों high quality के हैं।"
These durable and eco-friendly bags are ideal for industries like agriculture, food, textiles, and retail, offering both functionality and brand appeal. Designed for long-lasting performance and visual excellence, BOPP bag manufacturer provide excellent protection for goods while reducing environmental impact.
شركة ديدي كلين للتنطيف متخصصة منذ العديد من السنوات في تقديم الخدمات المنزلية الشاملة حول تنظييف المنازل ومكافحة الحشرات وصيانة الأفران والعديد من الخدمات المتنوعة الأخرى. كما أننا نعتمد على صفوة من الخبراء والمتخصصين في تقديم جميع خدماتنا لضمان تحقيق أفضل النتائج والحفاظ على أعلى مستويات الجودة والاحترافية
ارخص شركة تنظيف بمكة
Post a Comment