

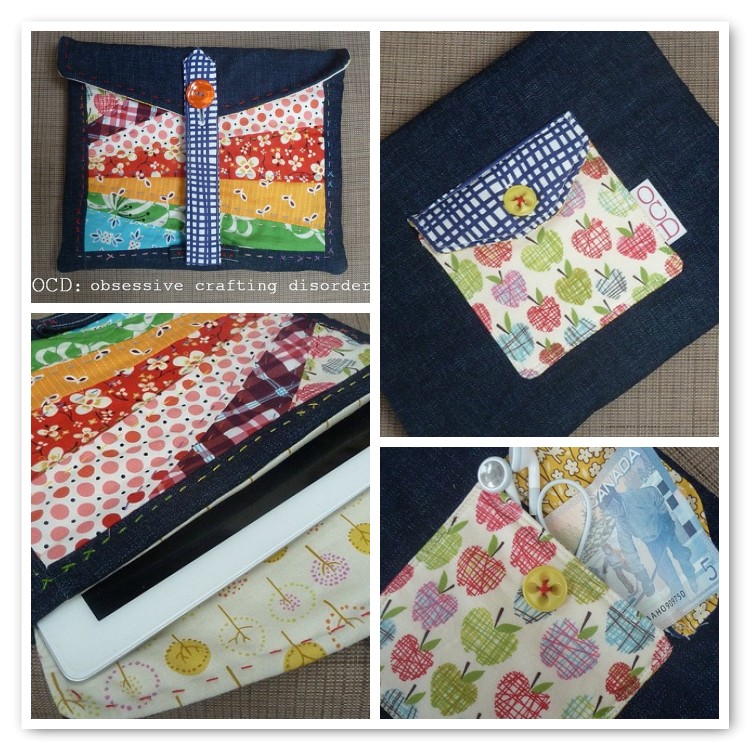
I am loving my new iPad, and it needed a home. So I made it this cozy quilted cover! It features a padded main compartment with a loop strap closure to securely hold your iPad inside. On the back I have added a convenient pocket, just the right size to stash some cash, your charger or some earbuds.
 Do you want a new sleeve, too?
You will need:
A fat quarter of home decor weight fabric for the exterior
A fat quarter of quilting cotton or other fabric for lining
A fat quarter of fusible fleece interfacing OR you can use scraps of quilt batting like I did :)
Scraps of coordinating fabric for pocket
Long piece of coordinating fabric for strap (15" by 4")
2 coordinating buttons
Thread
Cutting your pieces:
This pattern can be easily adapted for the original iPad, laptops or Kindles, etc. For thin devices, add 1.5 inches to the length and width of your device. If your device is thicker than 0.5 inches, then increase proportionately. Email me if you need any help with the calculations!
Here are the instructions for an iPad 2:
Exterior fabric, interior fabric and batting:
Cut two pieces from each measuring 11" wide by 9" tall. If you like, you can piece the exterior front panel like I did to a final size of 11" by 9" and use that!

Cut one piece from each for the exterior of the flap measuring 11" by 4". Fold in half width wise and trim at an angle (see photos and instructions below for back pocket flap).
 Loop: cut piece measuring 2" by 3.5 " from exterior fabric, or coordinating scrap if you wish
Strap: cut piece measuring 15" by 3" from each both the strap fabric and batting.
Pocket:
For pocket body, cut one piece measuring 5" by 5" from each of the exterior and lining pocket scraps/fabrics and batting. Then cut exterior fabric, lining fabric and batting measuring 5" by 3" for pocket flap.
To make angles for pocket flap and sleeve flap:
Fold exterior fabric in half width wise (i.e. for pocket flap, fold the 5" end and for sleeve flap, fold the 11" end). This is done to ensure that the angles will be symmetrical.
Cut off fabric from one corner at an angle as shown. I started a small amount away from the folded corner so that the flaps would be flat at the bottom and not pointed, then angled to the flap outer edge. In the photo below (showing the pocket flap), I started 0.5 inches from the folded corner and angled back to about 1 inch from the corner of the outer edge. For the sleeve flap, I started 0.75 inches from the folded corner and again angled it to 1 inch from the outer corner. This is NOT precise, only a guide, so don't panic, you can make this angle whatever you would like! It will look great!
 Once you have made the angle on the outer fabric, you want the other 2 layers to match. To do so, use the cut layer as a template, placing it on top of the other 2 layers to cut as shown:
Unfold, and you will have 3 identical flap pieces like these:

Assembly:
* All seams are 1/4 inch unless otherwise noted*
Make pocket:
Make fabric sandwich starting with batting, then exterior right side up, followed by lining right side down. Sew on 3 sides leaving the top open.

 Use opening to turn right side out. Tuck in raw edges.
Press and top stitch.
 Do the same for top flap of pocket. Add button hole of appropriate size to flap centered near bottom of flap using button hole function on sewing machine (refer to your machine manual, or visit the Sew Mama Sew tutorial here).
Pin pocket to back exterior panel. I layered it with the batting so that attaching the pocket would sew through all layers for added security. Insert a label if you would like!

Sew on along two sides and bottom, leaving top opening of pocket unsewn. Pin flap to exterior, sew on along top edge. I did this twice- once with the flap in the "up" position as pinned in the above photo, then I flipped it into the "down" position and top stitched it in place as shown below:

Make loop:
Take loop fabric and fold in raw edges along length to center. Press. Then fold in half along center line as shown:
 Stitch along both sides:
 Fold raw ends under and attach to bottom center or front exterior flap. Do some quilting of the exterior front flap by hand or machine with the batting layer, if desired.
Sewing sleeve exterior:
Make sandwich as follows: exterior back (facing UP), exterior front (facing DOWN), batting.

Sew along two sides and bottom, leaving top open. Turn right side out.
 Sewing lining:
Arrange lining pieces, right sides facing. Sew along two sides and bottom as for exterior, but leaving 3 inch opening in bottom center.

Make strap:
Align strap batting on wrong side of strap fabric. Fold in half lengthwise with batting facing outward. Sew along raw edge.
 Turn right side out (I do this using a safety pin, as seen in this tutorial) and press with seam along one side. Tuck raw edges in at one end- I did mine so that it came to a point, but it could be square or any shape you wish. Top stitch close to edge around all sides. Add a button hole of appropriate size approximately 2 inches from the end.
*Note: It is a good idea to refrain from adding the button hole to the strap until the final step, to verify its position once the sleeve is completed. Run the strap through the loop and back up, with your iPad in place, to accurately measure where to place the button hole. Otherwise, you could end up with a strap that is too long or short!
 Note: the other end of the strap can remain raw as it will be sewn inside the flap.
 Sewing the sleeve flap:
Make flap by assembling fabric sandwich as shown below: batting, exterior right side up, strap with raw end aligned in center of the flap bottom edge and button hole end pointing to top edge of flap, lining right side down. Sew along sides and bottom edge, leaving top edge open. Turn right side out.
 Press, and top stitch by hand or machine along 2 sides and bottom edge.
Attaching flap and finishing sleeve:
Align flap with exterior fabric facing exterior of back of body. Sew with quarter inch seam to attach (Note- be sure to sew to back layer fabric only!).

Insert exterior bag, which is facing right side out, into lining, which is inside out. Tuck in flap and strap.

Sew with half inch seam all around the top edges.

Turn right side out via the hole you left in the lining.

Tuck raw edges of lining opening in and press. Sew closed along edge as shown.


Hand stitch buttons in place in proper relation to button holes. Measure and prepare strap button hole as discussed above.

You're done!

I hope you have enjoyed my iPad sleeve tutorial. Any questions? Email me at obsessivecraftingdisorder@yahoo.ca and I will be happy to help.
As always, my tutorials are copyrighted for personal use only. I donate many hours of my time to prepare this pattern for your use, so please be courteous and give credit where credit is due- link back to me if you blog about your newly made sleeve. I'd love to see your creations! Be sure to hook 'em up to my Flickr group! :)

12 comments:
i wish i had an ipad so that i could make this cute little pouch for it! nice tutorial!
This is awesome! I need an updated sleeve for my iPad and I love the button closure {despite my dread of button holes}.
Great tutorial!
Jennifer :)
Cute tutorial. Now I just need the ipad.
Very nice! My sister has a naked iPad. I think she needs one of these...
This is great.
Wow! Thank you! I'm sooo going to make one when I get my OWN ipad!
Perfect! I've been wanting to make something for the leappad my daughter was given this Christmas. This would work great! Thanks.
So excited to make one! Thank you sooooo much.
AWESOME!!!!!!!!
Wow, thanks for making this awesome tutorial! I would love to attempt it but I'll need some time to develop my non-existent sewing skills :D
Meanwhile, I hope you don't mind if I share this on my blog :) Here is a link to the post: http://kobz68.tumblr.com/post/30853783519/pretty-cool-tutorial-for-diy-ipad-sleeve
It works with ios 7 too? ... I am joking, great job! :)
Post a Comment