

Welcome to Bag Lady Week!
(enter Oprah-like whoops and hollers)
(enter Oprah-like whoops and hollers)
I thought I would kick things off with a tutorial for some fabric market bags that can be rolled up and tossed into your purse, ready when you are! These babies are lined, so strong enough to tote the heaviest of purchases, and the twill tape handles are a fun feature. I hope you enjoy!
Here for the giveaway by Needle and Spatula? Scroll down for details!
I came across this super cute fabric (on clearance!) at my local Fabricland:

Perfect for making reusable grocery bags! I have a few that I have picked up along the way that are compact and fit nicely in my purse, and I love having them on hand. I have been itching to make some with twill tape handles ever since seeing those made by Elizabeth. Making handles is classically my least fabric part of bag making, so the twill is the answer! I decided to make a few for myself and for swaps for some of my bloggy friends. And while I was at it...a tutorial for you!
Here a few examples of the bags. The first I made for Kaelin, using some linen and patchwork. As you can see, it is a nice, generous size :)

The second one made its way to Sandy in Australia, using the scraps Elizabeth sent me:

I made one in Dream On and Meadowsweet for me, and one for Sarah:


And finally, one all for me. Perfect for trips to the wine store, for some "Mommy Medication," is it not?? Used some of Victoria and Albert's wine bottle print I won from Megan, lined with one of my very favorite older prints by Alexander Henry:


Two different ways to roll 'em up, folks! Ribbon ties (easy peasy):

OR more twill and snaps (a bit more work). Your choice!

Let's get started!
What you need:
-1/2 yard of fabric for exterior
- 1/2 yard of fabric for lining
- 3 yards of wide twill tape (mine was 1.5 inches wide) for snap closure. If using ribbon closure, you will need 2 yards only
- snap (I used a heavy duty magnetic purse snap, but you could use a standard one) OR 1 yard of ribbon
Sew it up!
* all seams are 1/4 inch unless stated otherwise*
1. Cutting (be cognizant of directional fabrics):
a. Cut 2 lining pieces measuring 18" tall by 16" wide.
b. Cut, or piece together as desired, 2 exterior pieces also measuring 18" tall by 16" wide.

2. Place lining pieces right sides together and sew along 3 edges, leaving top edge open. *Leave a 3 inch opening in the bottom of the bag* Reinforce with a zig zag stitch if desired for added strength.

3. Place exterior pieces right side together and sew along 3 edges, leaving top edge open. Reinforce with a zig zag stitch as in step 2.
 4. Square off bottom corners of bag. To do this, take exterior bag, inside out, and line up the bottom seam with the side seam as shown:
Take a ruler and draw a line 2 inches from the tip of the corner.


Sew along drawn line and trim. Repeat for lining!

5. Decide if you are adding ribbon ties or a snap tie.
For ribbon tie- cut into 2 pieces, 0.5 yards each.
For twill tape and snaps:
-take 1 yard of twill tape. Attach "male" part of snap, approximately 1 inch from end.
 -fold under 0.5 inch of raw edge, and fold again as shown:
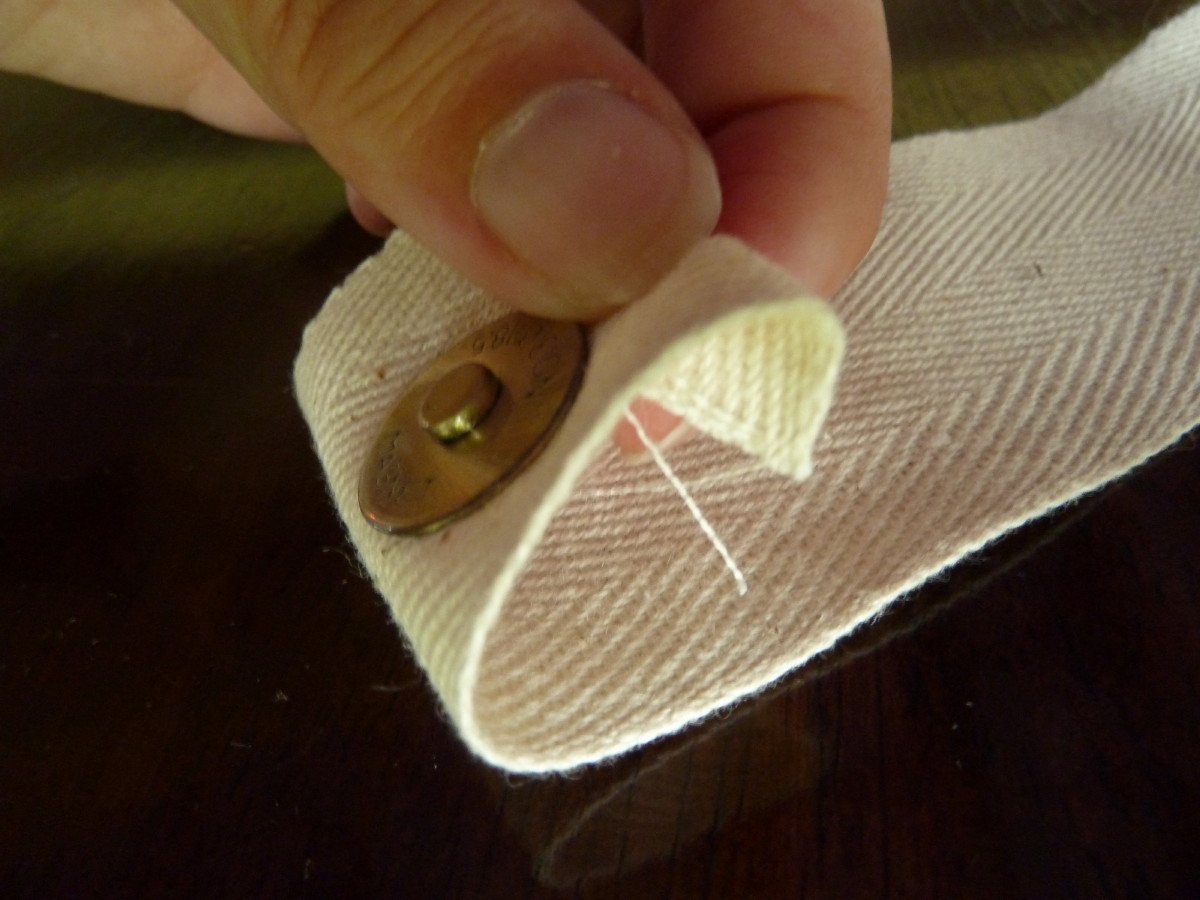 -stitch to secure
 -place this end face down. Attach "female" counterpart of snap on the other end of the twill tape in the same manner, also facing down. Then fold over the female end so that it is facing up, 9.5 inches from male end as shown:
 -sew to secure:

6. Once your ties are made, place exterior bag, right side out, inside of lining bag, which remains inside out (i.e. right sides should be facing each other). Insert tie between layers (sandwiched between the right sides) centered on the back of the bag, and pin in place.
 Note- if using snap tie, insert so male end dangles down, and female end is near upper part of the bag. The female part should be face down against the exterior of the bag:
The total length dangling down should measure 12" (see here, finished):

7. Sew along top edge. No zig zag needed here.

8. Turn the bag right side out through the hole you left in the lining in step 2.

9. Fold raw edges from lining hole into bag and sew hole closed with a 1/8" seam.

10. Press the top edge. Your bag will now look like this:

Attaching handles:
1. Grab your 2 yards of twill tape for the handles and measure center- press to mark. Fold end of twill tape over 0.5 inch and pin horizontally, aligned near top to the bag, so it overlaps one side seam slightly. Extend twill tape 4.5 inches towards center of the front of the bag. Fold twill tap upwards on diagonal to make handle.

2. Find your pressed center of the tape and pin it to the opposite side seam. Line tape towards center 4.5 inches in mirror image to the other side- the remaining twill tape will form your handle. Ensure it is not twisted and pin in place.
 3. Flip bag over and repeat for other side, with the end of the twill tape overlapping the start on one side seam. If centered properly, the handles should measure the same length (give it a check to be sure!). Pin it all in place.
 4. Sew around top of tape around entire top of bag, then continue sewing along the diagonal and bottom edges of the twill tape to secure. Just be sure to move your ribbon or snap ties out of the way, eh? Ask me how I know :)
 Finishing Up:
- if using ties- roll up and tie it up. Trim length as needed and knot ends to finish.
- if using twill and snaps, verify that it fits snugly when rolled up. Should fit well! If too short- grab your seam ripper....if too long, you can fold over some of the twill tape and sew to shorten.
That's it, people- you're done! Time to go shopping!

I hope you enjoyed this tutorial! For personal use only, please. If you have any questions, feel free to e-mail me at obsessivecraftingdisorder {at} yahoo {dot} ca
I would love to see what you made! E-mail me a picture or add it to my Flickr group for creations inspired by my tutorials.
NOTE: THIS GIVEAWAY IS NOW CLOSED
Phew! You deserve a treat after all that. How about a giveaway??
Have you met Kate from Needle and Spatula? Her site is filled with sewing/knitting/quilting and cooking inspiration and free tutorials! She also hosts a monthly Blogger's Dinner Party where you can show off your kitchen creations and win great prizes! She and I will be getting cozy over the next couple months as we do a joint quilt along, details to be announced next month! But right now, Kate is in Hawaii recouping from a cross country move...sweeeet! Kate has offered up a couple FREE PATTERNS from her shop! Would you like to make one of these little lovelies?

 I thought so! Leave me a comment telling me your favorite vacation destination. I will draw 2 winners on Monday, September 5- winners will get their choice of pattern! The patterns are also available for instant download in her Meylah shop or on Etsy and are currently on sale for only 5 bucks!
THIS GIVEAWAY IS NOW CLOSED
35 comments:
I kept feverishly scrolling down thinking 'in a minute, she'll say this one is winging it's way to No.6...' Did you forget to put that bit in?
Looking forward to tomorrow; should be a cracker ;-)
Great tutorial...I especially love how you made the handles! I've made plenty of bags before, so that is a new technique for me to try!
My favorite vacation that I've been on...since I've not been to many places, is Rehoboth, DE. We had a lovely time as a family at the beach there...I would happily go back!
Thanks again for a chance to win. The messenger bag pattern looks interesting...and she has a nice shop!
I love DisneyWorld! We went there in February and I hope we can go back each year!
Yippee! Bag Lady Week is here! I love the way you attached the twill strap to the bag...what an eye catching touch!
My favorite vacation destination? I'll go with the Swiss Alps. My husband and I were there 12 years ago and we are SO excited to take our girls back there someday, when they're a little older. : )
Thanks for the giveaway and I'm looking forward to following along with Bag Lady Week!
Very cute bag! With every post you make, you make me want to take up sewing even more! I'm definitely inspired and I'm sure with determination I could figure out the sewing machine;) What project would you recommend to a new sewer?
My favorite vacation spot would likely be the hot springs I went to in BC. Very relaxing!
Thanks for the chance to win:)
Putting this down on my list. Love those handles as they are the least favorite part for me, too. The question is, just how many bottles of "medicine" can this baby carry?
As for the vacation spot, I love NW Montana. So beautiful up there. We are leaving for Door County, Wisconsin in a couple days, so we'll see if that can takeover the top spot. Thanks for the tutorial!
I see me making many of these! Thanks for a great start to Bag Lady Week! SMiles~Beth
Great bag tutorial, I especially like the options for how they can be tied when they're all rolled up.
My favorite vacation destination is lakes. Growing up by the sea for some reason I've always loved lakes. Maybe because (for the most part) they're salt-free and scary wave-free.
Great tutorial!
My favourite destination is Ireland!!!
Looking forward to bag week!!!
Cool bags and great tutorial!
My favourite vacation destination is Paris. Yeah, I know, it's not like I'll be heading there every summer.
So cute! I love the fact that they are lined. Extra sturdy for super shopping! Thanks!
Love these! :) Hmm...my favorite vacation destination is the lake house! :) Thanks for linking up to {Sew} Modern Monday and have a great week!
Looking forward to following along with Bag Lady Week!
Very nice tutorial! However, I found myself giggling like a 12-year-old at the part about the dangling male end. What is wrong with me???
Anywho, I love Savannah, Georgia, and I'd like to go back soon (especially when it's not 100 degrees outside).
And thanks for the giveaway! My mom has turned into a yoga fiend, so I'd love to make that mat bag for her.
Ooh, I love that twill tape on the bag! These are awesome!
My favorite vacation spot is actually in Canada! My husband and I went to Banff for our honeymoon, and we're already dreaming about going back. It was so relaxing and gorgeous and fun, just like a vacation should be!
my favorite vacations always include visiting family - either my folks on the gulf of mexico, or my in-laws in hawaii. :) great giveaway!
bess
My DH and I loved Maui! Usually we are ready to go home when vacation time is up but we did not want to leave Hawaii. It really is paradise.
Great tute - I'm always looking for ways to use totes instead of plastic bags.
Great tutorial, can't wait to give it a try!! Thanks for the chance at the giveaway too!
As usual your easy peasy tutorial has convinced me I can do this! Duly book marked ...lets hope I can get the handles right!(that's usually where I manage to stuff up )
Lovely tutorial! And thanks for the giveaway. My fave holiday destination is Italy....Florence in particular. Would just love to get back there some time soon :-)
My favorite vacation destination is anyplace I haven't seen yet!
Great tutorial, thanks!
My favorite vacation destination would be Paris! I went there a few years ago and fell in love with the museums, food, shopping, and open markets. I recently made your small messenger bag and lined it with a Paris Street print for a friend who also loves Paris.
I am looking forward to a week of bags (my favorite!)
Very nice grocery bag. I love the twill handles too. Made it look fancier. My favorite vacation spot that I have been to has been 1000 islands, New York.
Love the tute! How useful is that bag oh my gosh! My fav vacation place is Connecticut. Of course that would be because the grands live there and it is where I grew up. It is beautiful though!
Great tutorial, Kristie!! and I LOVE the bag you made for me!!!! hugs, Sandy.
The linen bag you sent to Kaelin is what initially brought me to your blog. Love it! Thanks for the tutorial.
Hmm, favourite vacation spot? Since my vacations have been limited to visiting the in-laws in Wpg, or my honeymoon in PEI, I'm gonna have to go with PEI! Love Summerside.
Love the bags. I hate making handles too, so the twill fits the bill. My favorite vacation spot is going to Inverness Falls in the Whiteshell in the fall and winter. Cozy cabins, hot tubs, fireplaces - perfect.
Great bags! Glad that Kate is getting some R&R in Hawaii. I love her blog.
My favorite travel destination is anywhere my kids and grandkids are: DC, NY, NH, CO, and across town in Lincoln, NE. But someday, I'd like to visit Denmark. Both my grandfather's came from Denmark. It's on my bucket list.
Great tutorial and bags! I really like the tote to carry "Mommy medication"!
Maine!! It is so peaceful and relaxing! Love chilling out in beautiful natural landscape!
That yoga bag pattern looks awesome!
Great patterns! I just love places with mountains for vacations.Like Martigny ind Switzerland!
My favorite vacations have been to Zihuatanejo Mexico. I've been there twice & would LOVE to go again! Your market bag tute is wonderful - there great tutes over on Kate's blog too. Would love to make a yoga mat bag. Thanks for the chance.
Disneyland and the beach! I've been to Costa Rica, Greece, and Italy, and they were all really fabulous too. I'm hoping my next vaca is a cruise somewhere :)
Ahhh, the sign of relief that back to school week is over, starting all the after school activities, just had a chance to catch up on your blog, its' so neat watching the making of my wonderful bag. It has come everywhere with me this summer and has come in handy for so many things! hope you had a wonderful holiday with the family, talk to you later.
There is a unit that emphases on types of bags & cases like totes, cross forms, and controls as well as a unit geared to the top designers in the world. On top of all of this, here are tons of blog admissions studying prizes, designers, and trends
Post a Comment