
You have already seen those, but go check out what others are making!

 Next up- for the kids' play room! These fabric hanging bookholders are simple but elegant. Love 'em!
  In time for Christmas, I would love to whip up some Black Apple Dolls for the little girls in my life. For the boys, these sweet patchwork scottie dogs on the Denyse Schmidt site, would be fun!
  Learning to crochet is on my to-learn list, and as soon as I do, I am going to make this gorgeous cowl. Kim, who is the sister-in-law of a girlfriend of mine (and who follows this blog- hi Kim!), made this, and has posted the pattern here. It looks oh-so-cozy for a fall day! Maybe in time for NEXT fall???
  Speaking of cozy, I love this tutorial for a t-shirt scarf over at Vermillion Rules (sorry, can't get the photo to work!).
 In other ramblings, I am starting to get geared up for our trip to Italy this fall. You may recall, I surprised the hubby with the trip for our 10 year anniversary this June. We are heading primarily to Portofino and Cinque Terre in the Italian Riviera region. Just doing some planning and booking now for a couple days we have before our tour....anyone been there? Any suggestions for hotels/B&Bs/restaurants? Can't wait to go! I went to see Eat Pray Love and that got me even more excited about Italian hand gestures and gastronomy :-) Better pack my big girl pants!
 It's been a busy blogging week celebrating my favorite accessory, and I thought I would wrap it up with another tutorial. These bags made me so happy, I had to share the pattern. These are great, for business or pleasure. They are a bit more work than your average project (at least for me), so allow yourself about 3-4 hours to cut and complete. I think they are worth the effort!
There are 2 sizes. The "regular" messenger finishes up around 15" wide by 10" high and is 3" deep. Perfect for binders, clipboards or laptops: The "mini-messenger" is more purse-sized, measuring 9" wide, but is still 10" tall and 3" deep:
You will need:

Cutting your pieces
"Regular Messenger":
Outer fabric pieces:
front and back panels- 15.5" by 10.5" (cut 2)
flap: 15.5" by 10" (cut 1)
back pockets: 15.5" by 9.5"
sides and bottom: 15.5" by 3.5" (cut 1 for back) and 10.5" by 3.5" (cut 2 for sides)
loops for rings : 3" by 2.5" (cut 2)
Lining fabric pieces:
front and back panels- 15.5" by 10.5" (cut 2)
flap: 15.5" by 10" (cut 1)
inner pockets: 15.5" by 6.5"
sides and bottom: 15.5" by 3.5" (cut 1 for back) and 10.5" by 3.5" (cut 2 for sides)
loops for rings : 3" by 2.5" (cut 2)
loops for buttons: 5" by 1.5" (cut 2)
Note- extend length of button loops if you are using very large buttons
Interfacing:
front and back panels- 15.5" by 10.5" (cut 2)
flap: 15.5" by 10" (cut 1)
sides and bottom: 15.5" by 3.5" (cut 1 for back) and 10.5" by 3.5" (cut 2 for sides)
Shoulder strap:
To make from fabric- cut 1 piece each of outer fabric and lining fabric
45" (or WOF) by 2.5"
OR
use 1-1/4" webbing (length 45")
OR
use a recycled belt, cut about 12" from where the strap attaches to the buckle
OR
get creative :-)
"Mini-Messenger":
Cut same pieces as above, but change all measurements that are 15.5" to 9.5"
Let's sew!
Note- all seams are sewn at 1/4", unless stated otherwise.
Additional note- please tolerate my sucky photos. I do most of my crafting in the wee hours of the night when my kids are in bed (no more nap times at my house!) so there is no natural light to be found. These are kind of washed out, but hopefully clear enough!
One Last thing- the following photos show the assembly of the mini messenger. Same rules apply for the big guy, just watch during the flap step that you put your button hoops on the long side of the flap fabric (not the short side).
1. Preparing the flap of the bag:
Take 2 button loop pieces. Fold over one long end 1/4". Press.
 Now roll it up, rolling 3 times, from the other end, until it looks like this:
 Sew along the edge to close. Set aside.
  Grab flap piece of lining fabric and set it right side up. On top, put the outer fabric, right side down. Put your interfacing on top.
  Make a loop with the button loop pieces you just made, and insert them into the sandwich, loop inward, about 4" in from the outer corner (1.5" in on the mini). Depending on the size of button you are using, allow more or less length for the loop- I think it looks best if the loop is snug on the button. Pin loops in place. If you are adding a label to the flap as I have done, insert it as well, ensuring that the words are facing towards the outer fabric and not the lining.
  Sew along the 2 side and bottom ends.
  Clip corners, trim excess, and invert flap piece. Push out corners, and press. Do some top stitching to snaz it up. Set aside.
 Sew along top only. I did 2 lines, one close to the folded edge and one 1/4' down.
 Add a label if you would like (if doing the mini like shown here, add the label to the lining body, not the pocket).
 Sew vertical lines (I did double lines at 1/4" apart again, simply for style) to separate into pockets of the sizes you would like. In the regular messenger, I used 2 sets of lines equally spaced to make 3 pockets. For the mini, I divided it into 2 pockets, then added my label at this point, just above the pockets. Take the bottom piece of lining, place with right sides facing, and sew along raw edges.
Flip bottom piece aside, align 2 side pieces with right sides facing, sew.
 Align corners. Sew.

Repeat to add front piece of lining. LEAVE A 6" SEGMENT OF THE BOTTOM OPEN IN THE LINING AS SHOWN. You will need this hole to invert your bag as one of the final steps. Set your lining aside.

3. Preparing the outer body:
Take pocket piece and fold over top 1/4", press, then fold 1/2" and press again (note- with some of the heavier wools, this may not press well). Stitch along fold, and again at 1/4". Align on back body piece such that bottoms are in line. Pin in place. If doing regular messenger, mark center and stitch to make 2 pockets, and stitch in place. (Note- the mini is shown here with 2 pockets, but I found them too narrow to stick your hand down...for the mini, one pocket works best, so skip this step!).
Assemble the outer bag much like you did the lining, only include the layer of interfacing on the wrong side of your outer fabric. Also, do not leave a hole- close all seams. Be aware that sewing through 2 layers of wool and 2 layers of interfacing is one mighty thick sandwich!!

 Invert your outer bag.
 4. Putting it all together
Make the loops for your shoulder strap rings by aligning pieces, right sides facing, and sewing along long sides.  Invert, press, and top stitch along long sides. Set aside.
 Now it is time to attach the flap to the outer bag. Align prepared flap with outer side facing the back (pocketed) side of the outer bag, raw edges aligned. Pin, then sew. (Note- if you want to have the external pockets on the front under the flap, instead of on the back, then pin flap on opposite side. To-may-to, to-mat-o. You choose.)
 Thread rings over loops:
 Center loops (with rings inside) to sides of bag, on outside of bag with raw edges aligned. Pin and sew.
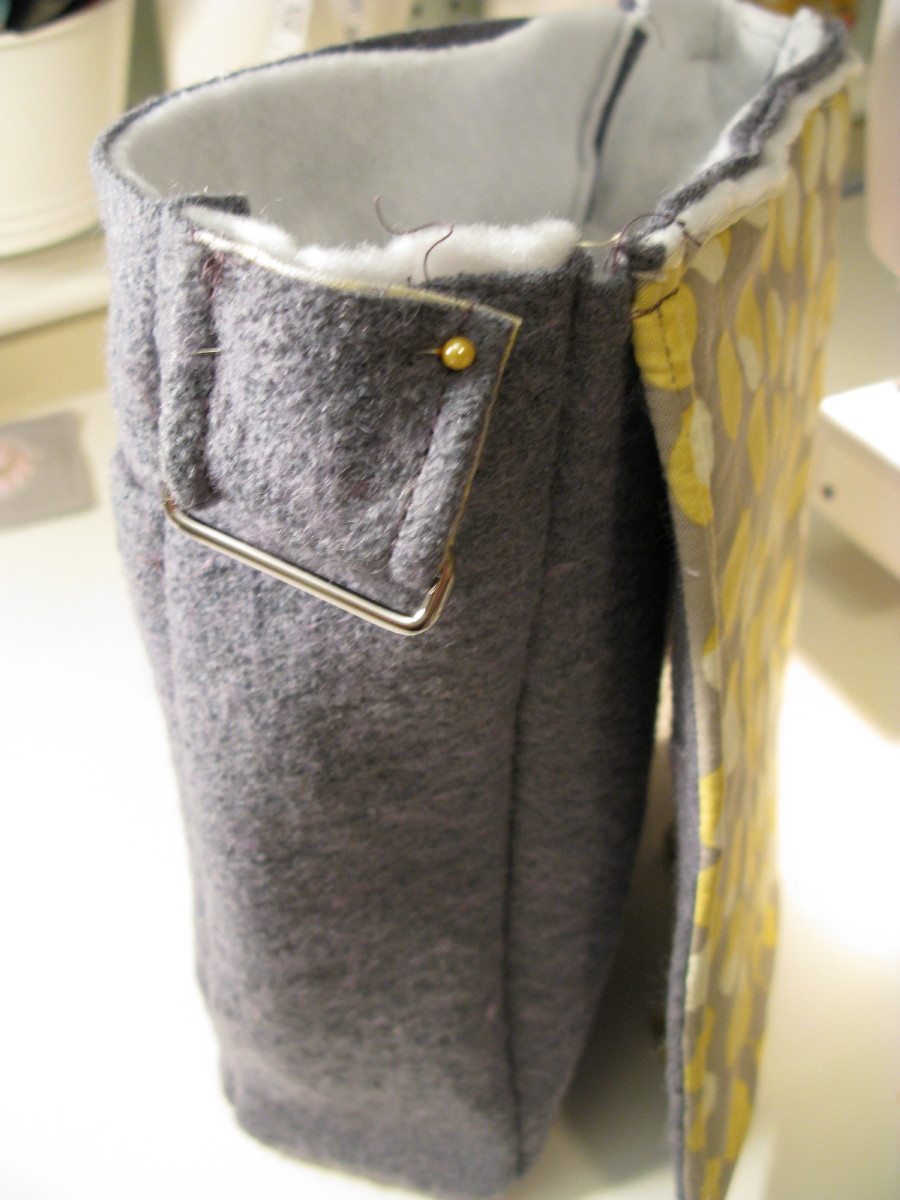 Grab your lining and invert. Slip over outer bag so that right sides are facing and the lining pocket is on the same side as the flap. Tuck flap and ring loops inside lining:
 Sew all around top to close:
 Remember that hole you left in the lining? Stick your hand through it and yank to invert this puppy!
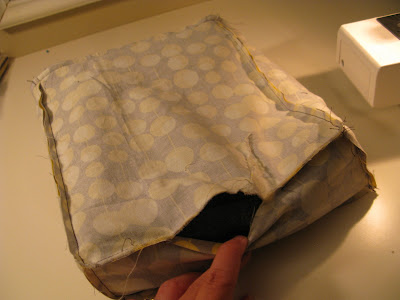 Tuck the open edges of the lining in on itself and sew it closed.
 Tuck all the lining nicely into the outer bag and press the seams. Top stitch around the top to help it stay nice and flat.
  Line up your button loops and hand sew on your buttons To finish the main body of the bag. You are almost done! Let's put on a strap.
5. Adding an adjustable shoulder strap:
Your strap can be made of the bag fabric, a recycled belt, or made of webbing. It you are making it from fabric, align pieces so right sides are facing, and stitch along length on both sides, leaving ends open. Invert the tube by attaching a safety pin to the lining fabric on one end, and snaking the pin through to the opposite end, working it with your fingers through the tube and pushing fabric back until the safety pin emerges on the other side:
 Press, then top stitch along length at 1/4".
Take your strap and loop through the center portion of your slider. Sew into place as shown:

Take the other end and thread it through the ring (left side, if looking at bag from the front) as shown: Loop it up and in one end of the slider from underneath:
 Loop it back over the other side and pull:
 Bring the other end to the right loop and thread around as shown:
 Tuck end in on itself and sew to secure as shown:
 You did it! You are done! Let me hear you say "Oh yah!" And maybe just a little happy dance.....
 I hope you have enjoyed the Messenger Bag Tutorial! I would love to see your beautiful bags, so please email me a photo or add one to my Flickr group! As always, my tutorials are intended for personal use only. Feel free to blog about your creations, but please be courteous and link back to this site so I can get credit for all my hard work and ideas. Happy sewing!
 The Mini-Messenger. Basically a purse-sized version of the one I showed you Monday. I. Love. It. Made it Monday night and have been parading it around town all week. So comfy on my shoulders, fits all my stuff perfectly. Happy, happy me.
  I made it in a flurry of creativity after midnight, and I did mess up and put the lap on the wrong side, so the back pockets ended up on the front, but in the end, I like it that way! I have a thing for yellow lately (especially Amy Butler yellow), and I have a fabulous yellow wool coat I bought in San Fransisco last year....fall is not too far off so I will likely be hauling it out soon. This bag will be the perfect accessory :-)
  Whenever I get happy, I want the world to be, too. So I am going to try to get a tutorial going on this, so you can make one, too. Just remember to keep one for YOU!