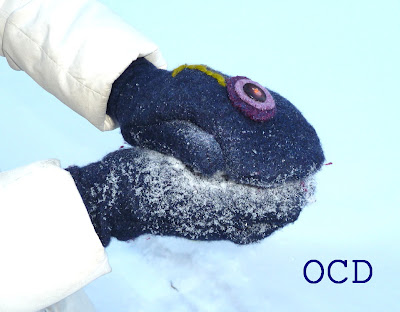
 Several weeks back, our 18 year old babysitter was over and I noticed her awesome felted wool mittens. I tried to play it cool, though I wanted to rip them off her hands and turn them inside out and dissect them. But the rational side of my brain (the one that doesn't want her to think I am a freak so she will actually babysit again) took control and I showed restraint....though I inundated her with way too many questions to be considered casual!
Anyways, they have been rattling around in my mind since then, so when I saw the wool sweaters at the thrift shop....jackpot!
Now, I know some of you people have been spouting off about SPRING and things BLOOMING (curse you!), but where I live, we have a month or two left of the white stuff.....and some pretty new mitts will certainly help me get over the winter doldrums. They are also a sweet gift for friends (if you want to get started on those Christmas gifts early!). So, let's make some felted mitts!

You will need:
- a sweater made of 100% wool (note: depending on the size, you can get 2-3 pairs/sweater)
- Some bits of fleece for lining, though you can leave them unlined as well. A half yard made me about 4 mittens. I used some Polartec fleece from my LQS. I'm not fooling around- I want WARM mittens! It was -25C degrees this weekend, so I can verify that these are indeed really cozy!
- thread, scissors, paper
- embellishments, if desired
- about 2 hours of time to kill
I would suggest this project for an advanced beginner or intermediate sewer...a few tricky parts, but not rocket science.
Here's what you do:
1. First you need to felt that sweater. This involved throwing it in the wash on high heat, then popping it in the drier with the same. Felting shrinks the wool up, making the weave nice and tight resulting in a nice thick, warm fabric.
2. Make a pattern: Grab a piece of paper and trace around your hand, leaving a generous margin of 1" or more. Go a bit wider than the picture here- the first pair I made were a bit tight. Don't trace around your thumb.
 (man, I look like I have old lady hands!)
3. Add a dashed line a few inches from the bottom, or the width of the cuff of your sweater. You will use the cuffs for the wrists of your mittens, but the lining stops inside so you can roll up the cuff if desired- the dashed line is for cutting your lining. Add 3 lines as shown for cutting out the thumb area. (Note- you will use this pattern in reverse for the second hand, so you can trace these lines on the back side of the paper as well to make left/right mirror image patterns).

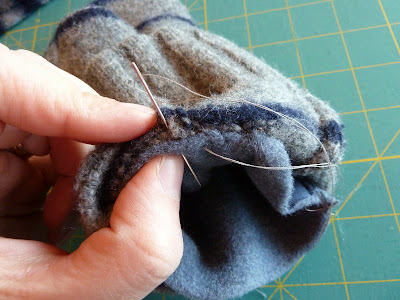
5. Cut your wool: Line up your sweater on the pattern with the sleeve cuff at the bottom. There will be a seam in the sweater sleeve (I am pointing to it in the photo)- it doesn't matter if you line it up on the thumb side or other, just make sure it is the same for both mittens. Cut- leave cuff intact.
6. Repeat for opposite sleeve in mirror image.
7. Use pattern to cut thumb area as shown for each side. ONLY CUT THUMB PIECE THROUGH ONE LAYER OF THE SLEEVE!
Cut two rectangular pieces of wool for the thumb area as shown (using the pattern from step 4).
Note- this is a good time to embellish your mittens if you would like, before they are all sewn together. I used some buttons, and made some decorative flowers and polka dots using bits of felted wool, Perle 8 thread and yarn. Fun!
8. Cut your lining pieces (if using lining) using the pattern and stopping at the dashed line. Note that you will have to cut a front and back side of the lining, with only one side cut for the thumb (see photo).
9. Assembling lining: Flip the thumb piece up and over. Align and pin thumb area as shown, right sides facing.

11. Try it on for fit and adjust as needed. Repeat for second hand.
12. Time to sew the wool. Flip the cut sweater sleeve inside out. Attach the rectangular thumb piece to the thumb area as you did for the lining, right sides facing (see step 9). Continue on to sew outside curve of the mitten. Zig zag, etc.
13. Flip it inside out and try it on. If you made a lining, slip that on your hand and the mitten body over top to ensure fit. Adjust as necessary for thumb length, etc. Once satisfied, invert mitten body again (lining always stays with wrong side out- that is how you will wear it!). 


Hope you enjoyed this tutorial! If you have any questions, feel free to email me at:
obsessivecraftingdisorder@yahoo.ca
I would love to see your creations! E-mail me a pic of the finished masterpiece, or add your photos to my Flickr site.
Have fun! Tutorial is for personal use only, please, unless you have my expressed consent. Feel free to blog about your creations, but as a courtesy please link back to this tutorial. Thanks!


24 comments:
how clever and resourceful are you? Seriously!
Very cool. I have a friend who loves all things wool and felted, these would totally be right up her alley!!!
I love this idea. I need to be on the look out for a sweater to use. Thanks for the tutorial!
These gloves are just adorable. I'm still at beginner level when it comes to sewing, but would love to attempt these one day.
sheesh, what a great idea! and so very cute!
These? Are awesome. The tutorial? Even awesomer. Hellooooooo, Christmas presents!!!
I truly giggled at you trying to control yourself and not freak out your babysitter.
Such a cute idea! I know I have some sweaters around here that I could cut up...
Not like I needed another reason to buy more wool sweaters. ;) Love these...and have added them to my homemade Christmas list for next year. :)
Just what I needed! I took a few old wool scarves out of my "wear" lot and put them in my "up-cycle" box this weekend... Soon to come, some garish-colored wool mittens! Thanks for sharing!!!
thumps up ,this is a great tut ,thanks for sharing it
Your winter glove tutorial was just featured this on my blog-- with other wonderful glove tutorials! thanks for sharing it. http://www.patchworkposse.com/blog/2012/12/winter-mitten-tutorials/
I like that these have no seam across the palm. Great job!
I am game to try this for my grandchildren. As for me, I wish you could figure out how to adapt this technique a bit to make slipper socks to warm my cold feet in bed.
Teri at: Halcyonwud@aol.com
Several weeks back, our 18 year old babysitter was over and I noticed her awesome felted wool mittens. I tried to play it cool, though I wanted to ... awoolsweater.blogspot.com
This pattern didn't work for me. I did it once, did it twice, did it THREE times, and there is a problem with the measurement of the hand length once the thumb is assembled onto the palm. You should have a look at this again. Wasted a bunch of otherwise good stuff :(
Thank you so much for the great tuto!!!
Loved it all except for the comment about the old lady hands.. not very kind to us older women:-9
"This blog is a breath of fresh air! The author's passion for the topics shines through in every post, and the writing is both informative and engaging. It's clear that a lot of effort goes into crafting each piece. Keep up the fantastic work!"
https://www.aintpayingfull.com/promotions/all-stores
"I just wanted to take a moment to express my gratitude for this blog. The content is not only informative but also leaves me feeling inspired and motivated. It's evident that the author is passionate about their craft. Thank you for sharing your wisdom with the world!"
flash photography discount code
"Bravo to the author for the blog's dedication to highlighting and supporting lesser-known voices. The inclusion of guest writers and the promotion of diverse perspectives contribute to making this platform a melting pot of ideas and experiences."
https://tryvoucher.com/all-stores
"Just wanted to drop by and express my gratitude for your blog. The variety of topics you cover and the depth of your analysis make it a must-read for anyone seeking knowledge and inspiration. Well done!"
palmetto state armory discount
"I've recommended your blog to friends and family because of the incredible value it provides. Your ability to simplify complex topics without compromising depth is a rare skill. Thank you for making learning accessible to a broader audience."
pizza boli coupon
great information buy wool gloves online
A good pair of warm winter gloves women is essential during colder months. I love gloves that blend insulation, comfort, and style so hands stay cozy outdoors. They make winter errands, hikes, and commutes much more enjoyable and manageable.
Post a Comment